Wednesday, October 26, 2016

One Room Challenge Week 4 | Tub & Shower Install


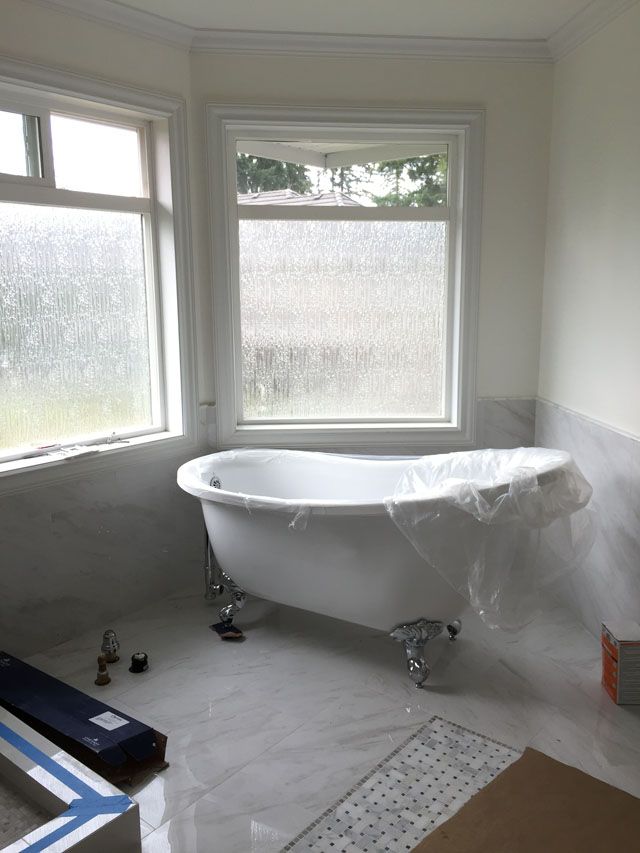
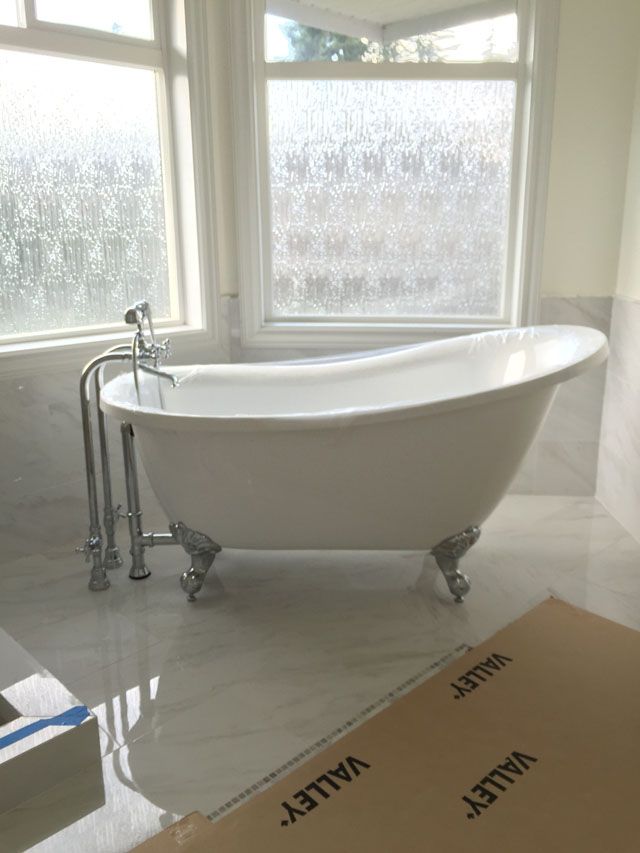
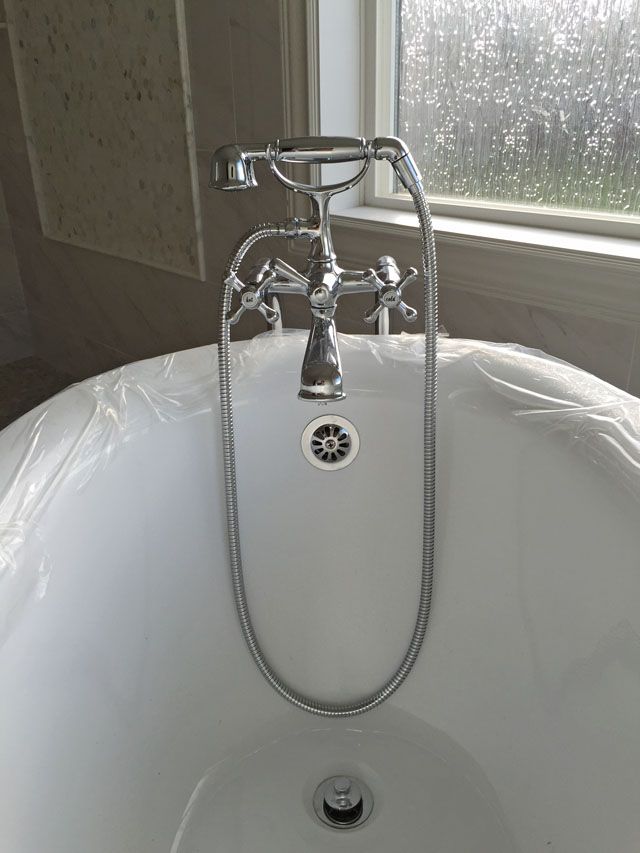
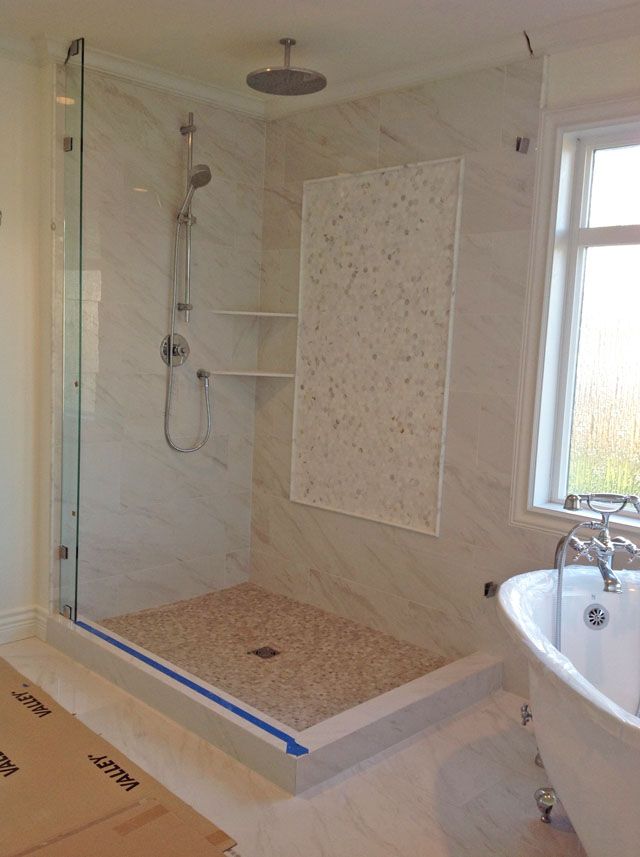
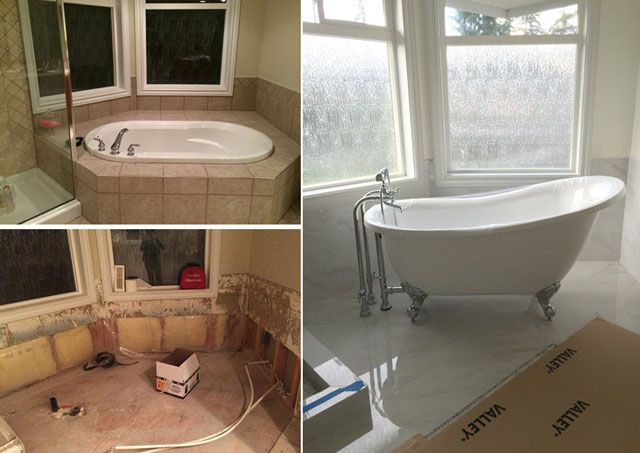
And just like that we are in week 4 ... the claw-foot tub fairies came for a visit and "poof!" we have a pretty bathing corner:


I love all the vintage-inspired finishes, and my most favorite thing is how much more spacious this tub makes everything look compared to the previous oversized built-in!


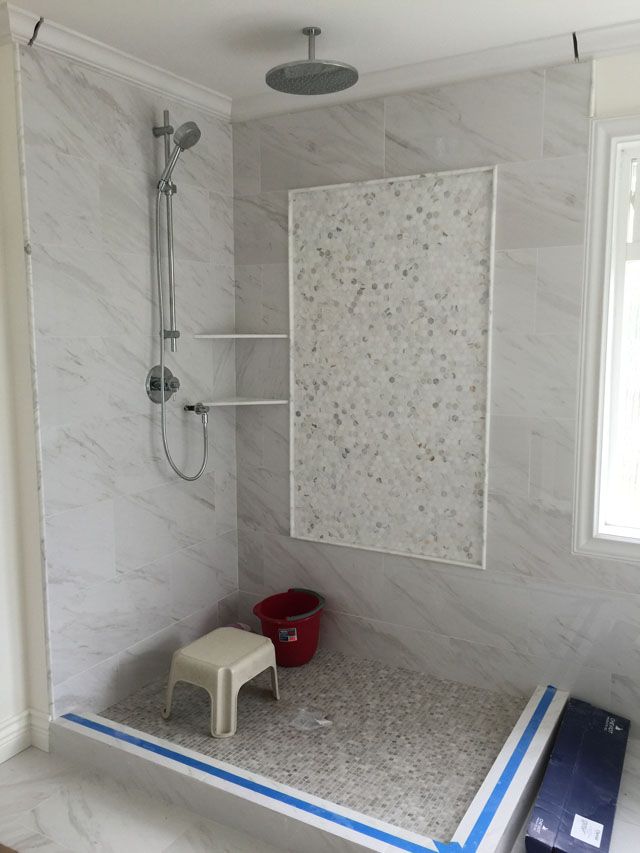
And speaking of pretty fixtures, the plumber has installed the rain head and shower head. Notice the slits cut into the crown molding? This was our solution to 'retro-fitting' the new shower walls that will go to the ceiling. A little bit of caulking and in the end you likely wouldn't have noticed it if I hadn't mentioned!


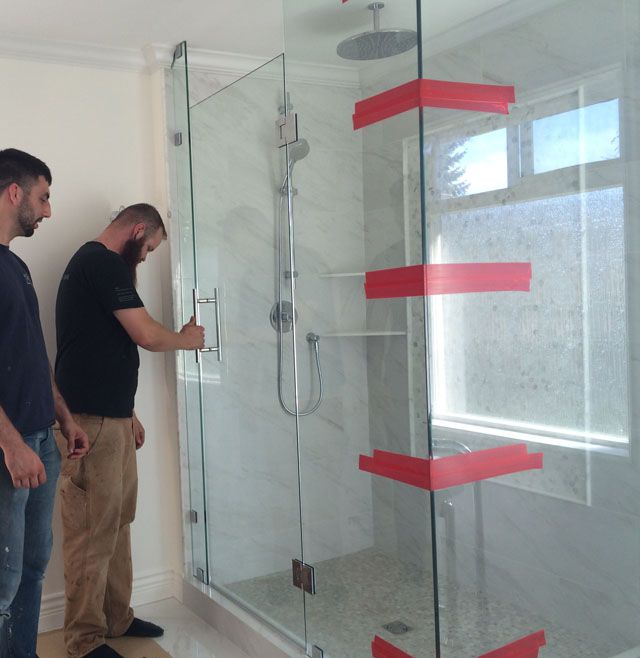
Here's how the new glass walls will work - we made a side panel that the new door will meet with, allowing us to switch from a right-swing out to a left swing-out door for easier towel grabbing!!


And the door & walls installed!! I should mention these had to be measured and re-measured 3x before they arrived in the right fit - I may have been sweating a bit with nervousness on that one. But it was worth the wait, isn't it lovely?


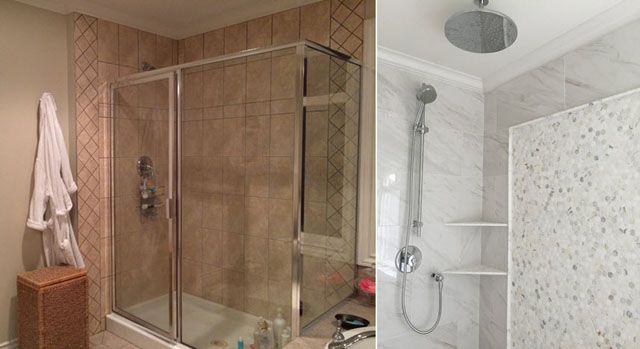
A side-by-side to remind you how far we have come already:


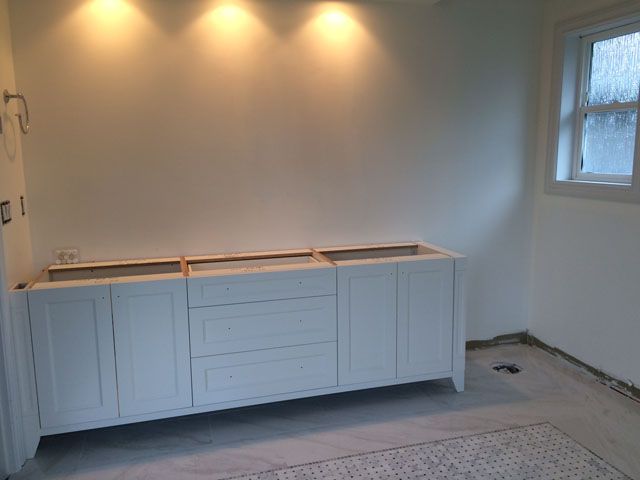
And the last piece to be installed was the vanity, still waiting on the counter top but I think it's looking mighty fine! Can't wait to see these mirrors hung above it.


And soooo many goodies are rolling in for all the pretty styling, follow along on Instagram and I'll be giving you more sneak peeks this week & will post them here in week 5 as well.


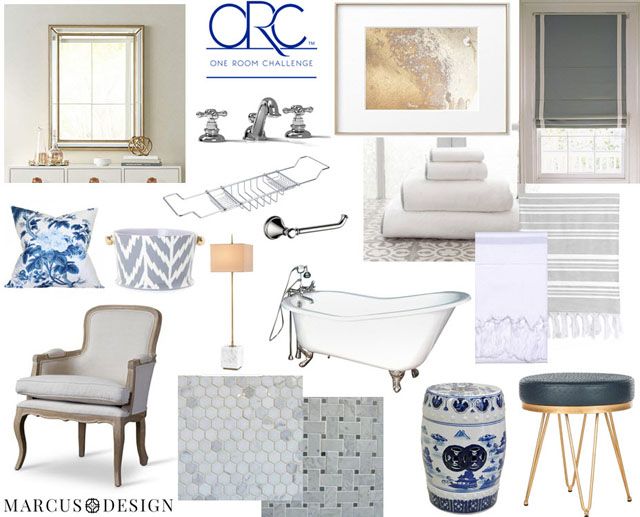
Gold beaded mirrors (LampsPlus) | Vintage style faucets | Aurum Sand No. 3 art print (Minted) | Roman blinds (Tonic Living) | Grey-banded cotton towels (Annie Selke) | Pyne Hollyhock pillow (Arianna Belle) | Orchid Cache pot (Jill Rosenwald) | Brass & marble lamp (Bellacor) | Tub caddy and Tissue holder (ATGSores) | Claw foot tub | Turkish towels and Faux Ostrich navy stool (Joss & Main) | French accent chair and blue & white garden stool (ATGStores) | Marble hexagon & basketweave tile 

What's left:

- Quartz counter, vanity hardware, faucets, and backsplash install
- Toilet & tissue paper holder install
- Hang mirrors and artwork
- Hang and steam the Roman shades
- Clean and seal all tile
- Doll it up with all the pretty!

Next week is pedal to the metal. We have to be ALL done several days before the final reveal in week 6 because we have our professional photos being taken by the amazing Tracey Ayton (to say I'm excited about working with her would be a severe understatement - I've been a huge fan of hers for so long!). I'll share sneaks of the final installs in week 5 and then we will be almost camera-ready for the BIG reveal. Fingers crossed!!!

Don't forget, go see all the other amazing designers & what they are up to this week - I'm going to spend all morning doing so myself! And check in tomorrow for the massive inspiration coming from all of the guest participants - if you are on IG just search #oneroomchallenge :)


Waiting on Martha  Media Partner House Beautiful | TM by CIH


PINTEREST    |    INSTAGRAM    |    TWITTER    |    FACEBOOK    |    BLOGLOVIN

Wednesday, October 19, 2016

One Room Challenge Week 3 | All About The Tile


This weeks One Room Challenge update is ALL about the tiles going in. If you're just joining in the fun, check out my before's from week 1 and demolition from week 2 to get caught up on this insane 6 week journey to complete a room! I know, I know ... a master ensuite is a pretty ambitious room choice. But truth be told, as I've mentioned before - we pre-planned extensively and ordered EVERYTHING well in advance. I honestly don't think it would be possible any other way! Here's a quick reminder of our inspiration board:


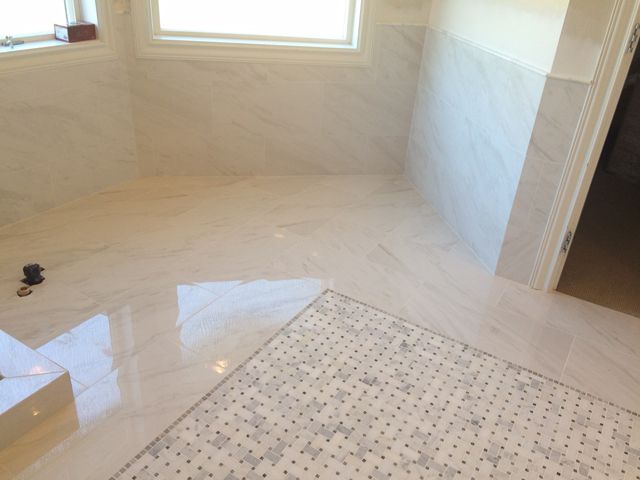
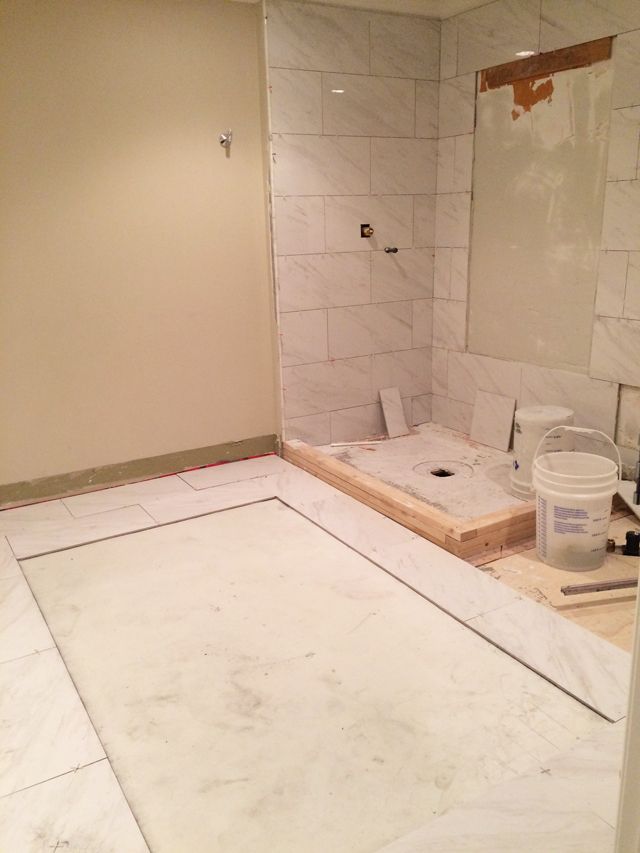
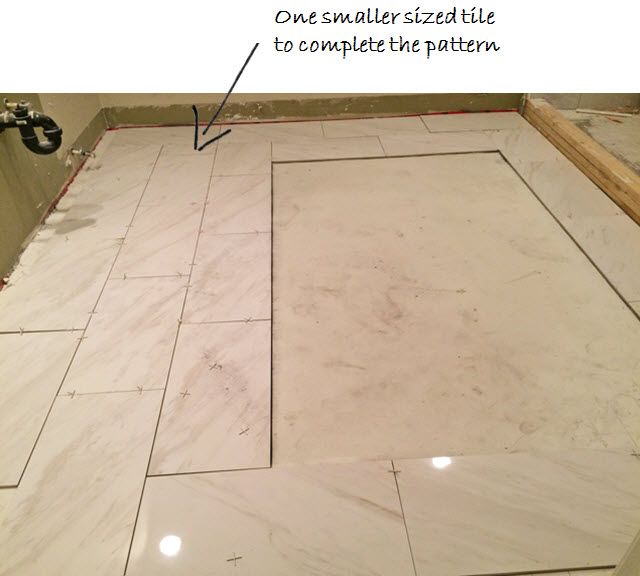
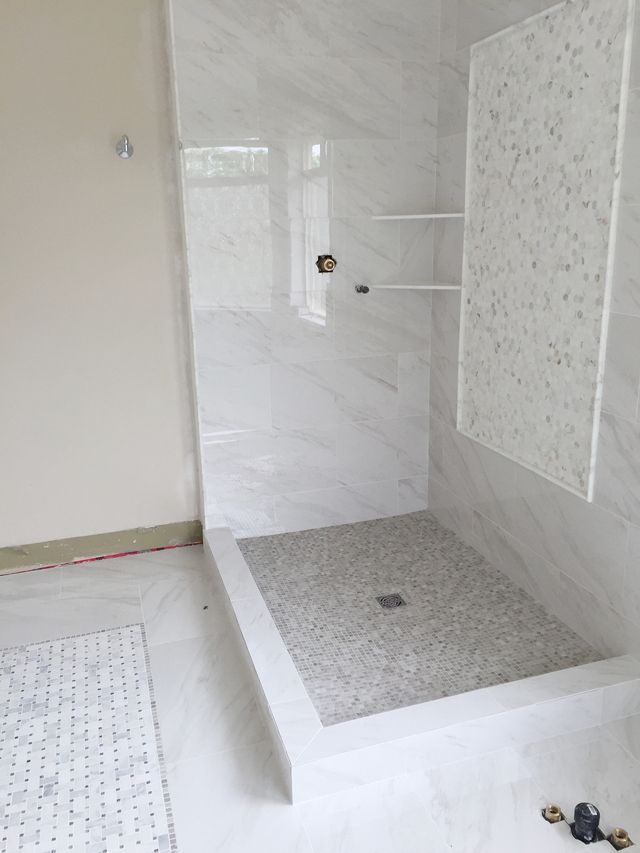
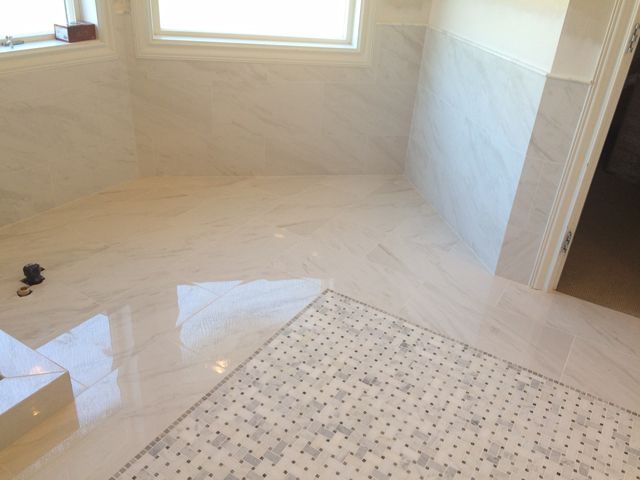
The marble is such a key to accomplishing this look. So you can imagine my excitement when the tile started to go up. It looks like we really are getting somewhere now!! What you see below is our porcelain tile in a 'marble-look' (for durability's sake) laid in a subway pattern on the perimeter of the floor and shower walls. The empty boxes are waiting for mosaic insets:


We came across a wee problem with the pattern on the floor - there would have to be 1 piece of tile that ended up being cut into a weird sliver of a size in order to accommodate the rooms measurements. If we didn't lay this out and literally measure EVERY tile we could have ended up with this weird mismatched tile size right in the entry to the room. Luckily after drawing it out in detail we were able to hide that smaller tile right where the toilet will sit on it! Lesson number 1; it pays to carefully plan.


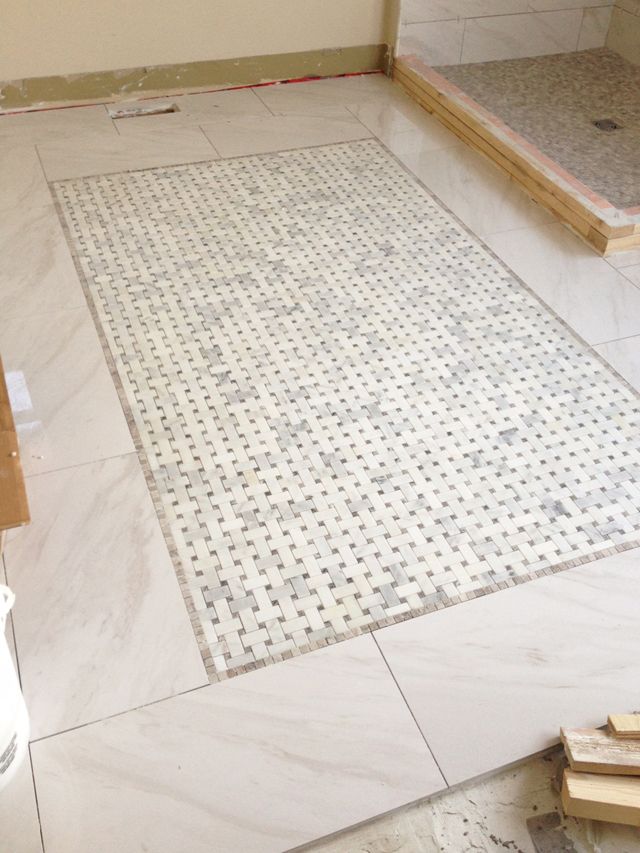
And in went the basket weave:


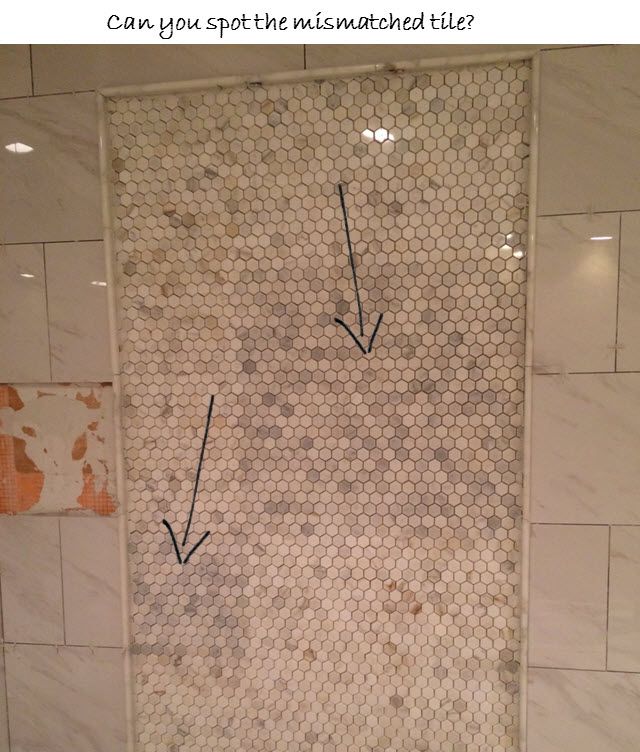
One more problem (with a reno you simply can't avoid them)! Once the inset of hexagon Calcutta marble went up, all I could see was a grey-er tone in a select few of the sheets. Lesson number two; it also pays to be picky! With natural stone you can't fully control what you are going to get, so hand picking out your sheets could honestly be worth it, and mention to your tile installer that if any piece looks too dark/light or too grey etc. to discard of those if you think the difference would bother you.


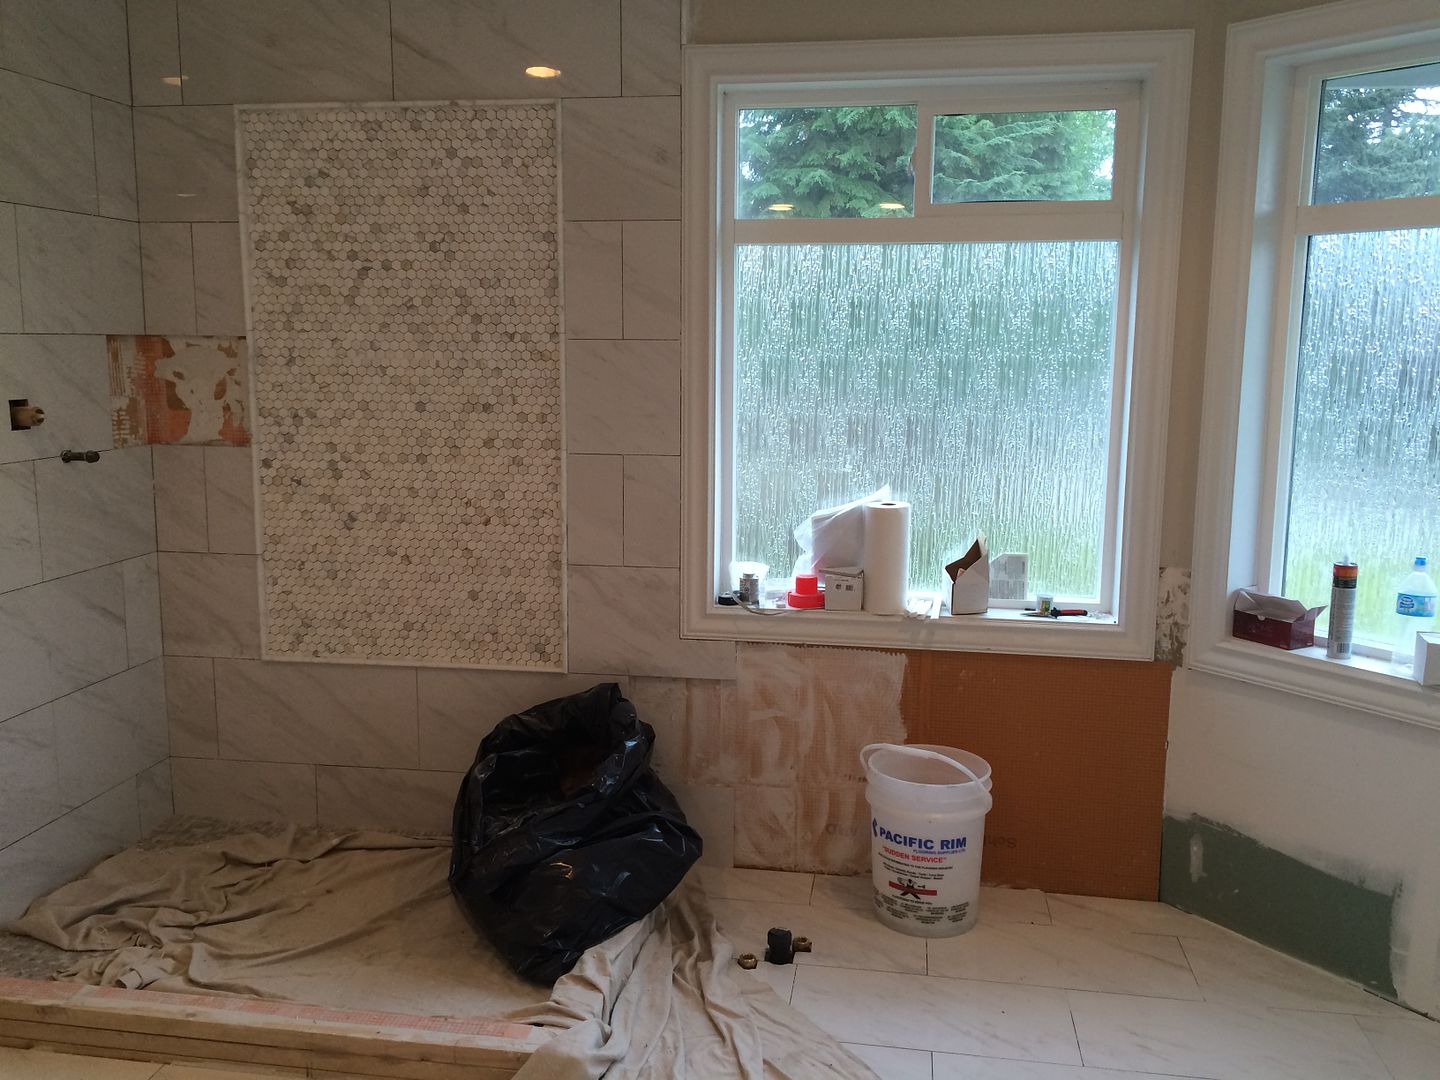
Out came those sheets for a better match from the same batch of tile, because I'm OCD and that would bother me! Much better:


And now all grouted, it looks amazing!! I am so excited with the results. We had 2 corner shelves put in, which had to be made from Carrara marble as porcelain would have an awful exposed edge and would not be as durable. I do have to say, I'm impressed by how well the natural stone mixes with the porcelain.


Here is a better look at the shower base, a moonstone mosaic we chose for it's darker and thus more durable appearance.


And here are the walls where the stand-alone tub will go! I finished the edge on the wall with a Carrera marble pencil trim.


Let's not forget what once was here only a short time ago ... so much better already!


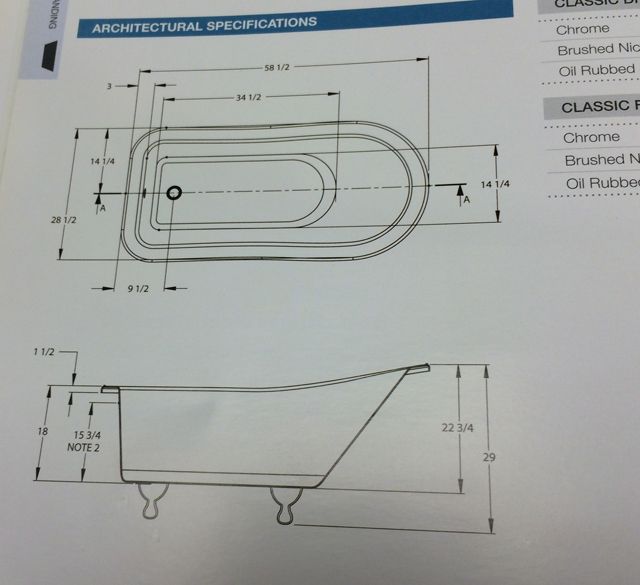
I'll be able to share the tub install in the next post, this beauty is coming soon:


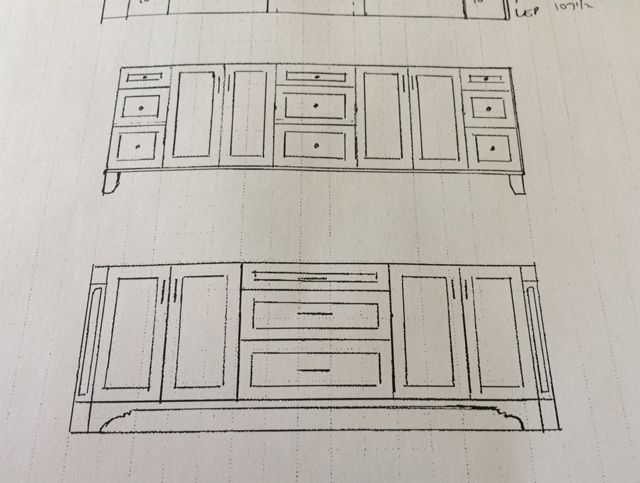
And in other news, the vanity has been designed and will also be ready to show next week, after a few design options the lady of the house chose the bottom drawing as it gives her nice wide drawers in the center of the unit.


That's all of my updates for this week! Next week a few more fixtures will be in and I'll share lots of the accessories that have already begun to arrive. In the meantime, be sure to follow along on Instagram to see sneak peeks along the way :)

And don't forget to check out what the other 19 amazing designers are up to this week, as well as the guest participants tomorrow. I cannot believe what all of these talented people are accomplishing!


PINTEREST    |    INSTAGRAM    |    TWITTER    |    FACEBOOK    |    BLOGLOVIN

Wednesday, October 12, 2016

One Room Challenge Week 2 | Demolition!


Ahhhhh ... a gutted space is so utterly satisfying isn't it? I think it's helped me to see a blank canvas with all of it's potential! I'd love to show you a look at the before's and the demolished space side-by-side to trigger your memory from last weeks post.

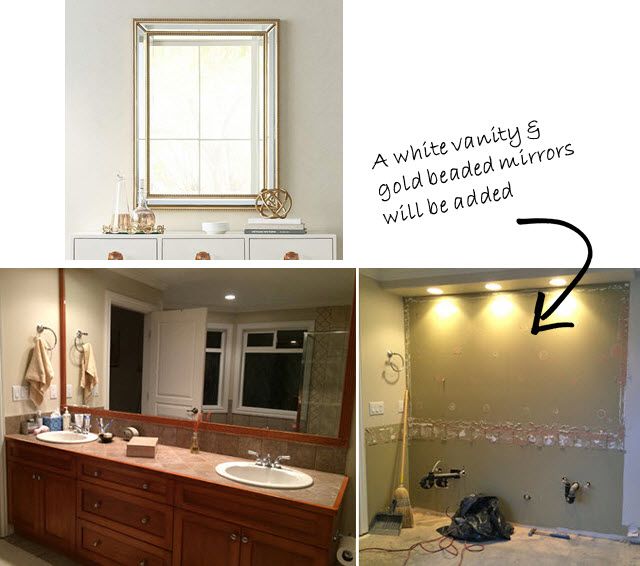
First up, the vanity area - we've removed the old vanity and mirror. In lieu of the one large mirror I've selected two lovely beaded gold mirrors, and a shaker style cabinet in BM cloud white is in the works (with this hardware for a traditional look). As you can already tell, we are definitely mixing metals in here!

The faucets that we purchased will have a traditional vibe with the cross-handle as well:


I'm super excited about the shower plans, the new glass enclosure has been ordered, and we decided to go to the ceiling with the panels (except over the door for venting). Also we've swapped the direction the door swings open so that the homeowners can easily reach their towels hanging on the wall hook. It was tricky planning as we had to be very careful where to place the chrome joints between glass panels and the ceiling. A note to those who decide to try this 'frameless' look, make sure the company you use will warranty the glass, if it's not up to their security standards they won't give you a warranty!
Also in the shower, the plumber has come and fitted for new fixtures including a rain shower! Go big or go home right?
Everything has been waterproofed:
And finally, probably my favorite nook, the tub:
I can't wait to see the stunning Tonic Living Roman blinds. I've selected a new soft grey drapery fabric that has a slubbed texture for the look of linen minus all the wrinkle hassle! I think this is going to do really well in a bathroom space with moisture.

Last but definitely not least, the material selections! So here is the version for this project, the paint color we are using is BM oxford white (a fresh but warm white), combined with a basketweave for the flooring, a pencil trim to act as a simple chair rail on the walls, and at the very bottom of the photo you can see a piece of the porcelain tile that will be placed around the perimeter of the room as well as the shower walls. If you remember from last weeks post, the marble-like porcelain is our attempt to have a low-maintenance space with the airy feel of the natural stone.

We will dress up a portion of the shower walls with a framed inset of Calacatta hexagons, which will also act as the backsplash above the vanity. The small mosaic squares are a natural moonstone with a slightly darker color to handle wear and tear as the base of the shower. Finally, the small sample labeled 'Calacatta Nuvo' is a quartz that will act as our vanity counter. All of the blue & white and gold will be brought in with accessories that I will share more of with you next week!

(all tile purchased through Creekside Tiles)

So that gives you an idea of where we are at with some of the major fixtures. Next week I'll share updates as well as some of the details of the accessories we have planned to use. I've ordered every last piece in hopes that we don't have too much chaos with such a tight deadline - but I'm still nervous when I think about how fast this has to wrap up!

And of course, don't forget to visit the other 19 fantastic designers spaces - there is so much amazing stuff happening with them and with the guest participants on Thursday's as well! Hope you are having fun following along this journey with me :)

PINTEREST    |    INSTAGRAM    |    TWITTER    |    FACEBOOK    |    BLOGLOVIN

Wednesday, October 5, 2016

One Room Challenge Week 1 | The Before!


Well here we go again, you probably wouldn't even believe me if I told you I was joining the One Room Challenge again, right? I have decided that this 6-weeks-to-get-an-entire-room-finished game is much like having a baby, you forget the pain and the long road to the finish line once you have the wonderful fruits of your labor there to enjoy (no pun intended)!

For those of you who are new here, welcome, I'm Nancy and I've been blogging about my passion for interiors since 2010. Literally started blogging as an escape of my stress during the completion of my PhD - talk about procrastination :) I'm undergoing a whole-home renovation as we speak so there will be lots of fun before & afters in the coming month or two. I joined the ORC hosted by Linda of Calling It Home as a guest participant in the spring (and completed a nursery and breakfast nook), and I could not be more honored to join for the first time as one of the 20 featured designers for this round! I am SO thrilled to be included in such wonderful & talented company (see all of my fellow designers linked at the bottom of this post) and sponsored by one of my favorite glossies House Beautiful.


Ok, on to the good stuff, the befores! This builder-basic master ensuite (circa 2000) belongs to a beloved family member who is entrusting me to re-do their space (no pressure!). Since my own reno budget has been blown out of the water and won't allow me to complete my master ensuite right now, I'm very happily implementing all the finishes I would choose for my own bathroom in this project. Lucky for me, the lady of the house has similar marble-slathered dreams, so this is going to be a lot of fun! Above and below you can get a feel for the space:


The best thing about living in a home for years before you renovate is that you get the chance to correct all the things you dislike about it's function/form. Here are the 5 MUST HAVE items the homeowners want to achieve by remodeling this room:

1. Get rid of ALL the tile. Some of the tile has a yellow undertone, some is a pink undertone - the mismatch has bothered the homeowners ever since the day it was installed! And the lady of the house hates cleaning the tiled counters (see below).

2. Install a seamless shower. No more metal frame, and we are taking it to new heights (literally)! The glass will go to the ceiling, and we will also design the door to open to the left rather than the current right-swing out door so that they are able to directly grab their towels off the hook.

3. Create a marble-clad space while still maintaining durability. This is a toughie but I think I am up for the challenge! We have sourced a marble-like porcelain for inside of the shower walls, and a darker true marble for the base of the shower as the lady of the house worries about products such as hair dye discoloring marble or the grout. We will be mixing marble hexagon, basketweave, pencil trim, together with the marble-like porcelain.

4. Remove the bulky platform tub with surround. Vintage style claw foot tub it is :)

5. Install window coverings, as the homeowner complains the sun can literally melt her lipstick on a warm day! We are going with chic flat Roman blinds from Tonic Living.


Truth? The homeowners are fairly mortified that I have to post the 'befores' for ALL of you to see, but let's be honest - it's going to make for some pretty dramatic 'afters' they will surely to be proud of!

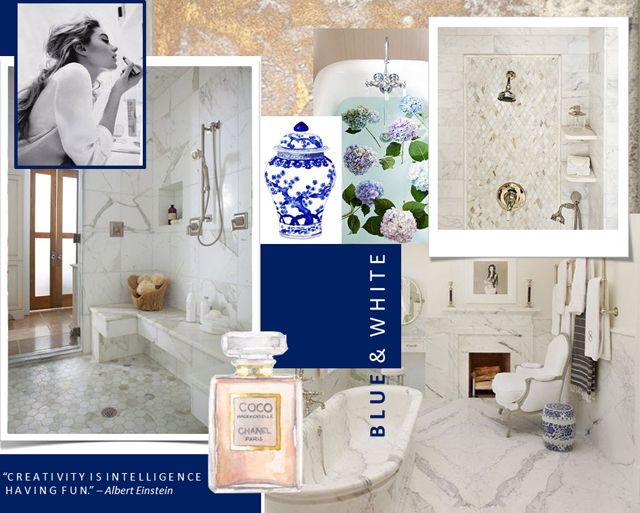
Here's a 'pin' board and the mood board I created to convey the look I am going for, all the permanent fixtures will be in a classic grey & white scheme, and I'm planning to liven things up with a touch of blue & white through accessories. Elegant and timeless.


Gold beaded mirrors (LampsPlus) | Vintage style faucets | Aurum Sand No. 3 art print (Minted) | Roman blinds (Tonic Living) | Grey-banded cotton towels (Annie Selke) | Pyne Hollyhock pillow (Arianna Belle) | Orchid Cache pot (Jill Rosenwald) | Tub caddy and Tissue holder (ATGSores) | Claw foot tub | Turkish towels and Faux Ostrich navy stool (Joss & Main) | French accent chair and blue & white garden stool (ATGStores) | Marble hexagon & basketweave tile 

I will show you all the materials next week and have pictures of the demolition to share! Things are already rolling as this is such a tight timeline so we have truthfully already begun, and we have ordered ALL products to make sure we meet the deadline. Some boxes are already arriving at my doorstep so be sure to check my insta stories for all the goodies.

I'll be tagging all of my IG posts with #marcusdesignrenos and #oneroomchallenge so please follow along with me over the course of the next 5 Wednesday's. Also, be sure to check in with all the designers this round, and the guest participants on Thursday, let the fun begin!!


PINTEREST    |    INSTAGRAM    |    TWITTER    |    FACEBOOK    |    BLOGLOVIN
Related Posts with Thumbnails
 

© 2010-2017 Nancy Marcus. All Rights Reserved. | Blog Design By Brittany Douglas