


I promised a little how-to post regarding our use of trim and millwork in our home, and I hope this will answer many of the questions I received! Disclaimer: I am no expert, I am not trained in design or AutoCAD (though I wish I was!) - so this truly will be a representation of a 'mouldings for dummies!'
One of my favorite brands I have been lucky to work with, and have posted about in the past, is Metrie, the largest supplier and manufacturer of solid wood and composite moulding in North America. They started up in 1926 as a small family-run business in my home town of Vancouver, and are now a leader at the forefront of design savvy interior moulding products. In case you missed it, you can see the full reveal of our entry and kitchen to view how we utilized trim to transform these dated spaces.
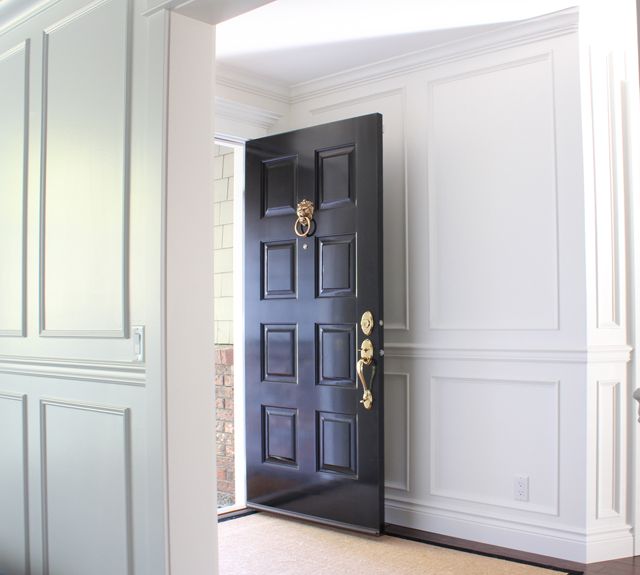
Q: Is the foyer picture frame molding or recessed panels?
We chose to go the extra mile and install recessed panels in our entry. We felt that this was the first impression to our home, and it would be worth the extra work and cost. What this meant is that we used flat stock MDF to build out the wall first, and place panel trim within these built-out portions. We have not regretted that decision, the details make the design!

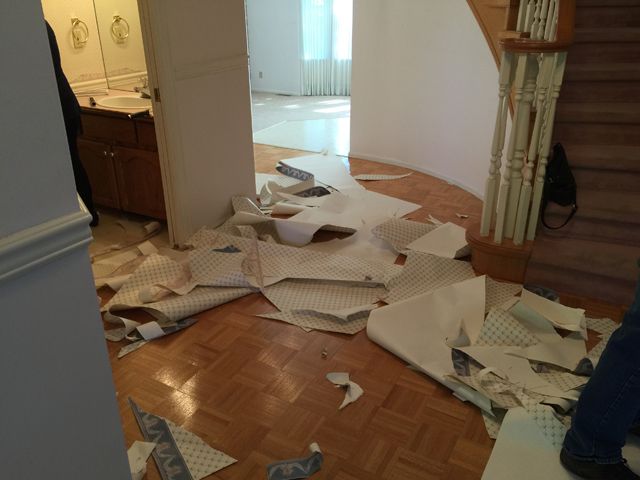
Q: What did you have to do to the walls after removing the
wallpaper?
Confession: I am insanely blessed to say that my dad-in-law is a professional dry-waller. After our family effort in picking off all of that wallpaper we (ie. HE) skimmed and patched the drywall with drywall filler to perfection before any trim was applied. It's very important to get that foundation right before moving on to the next steps! I'd say hire a professional to skim your walls if they are in crummy condition underneath of the old wallpaper.
Q: How did you plan out the moulding (ie selection and spacing)?
This was the most frequently asked question by far. What I think helps make things so easy for non-experts is Metrie's curated collections of coordinating trim and doors already grouped for you. This way you already know that the door casing depth will proportionally fit with the thickness of the baseboards to create a proper reveal, and the styles and profiles of each piece will flow together. The Metrie catalogue became my best friend during our planning period (as you can see tagged & marked below!). I selected coordinating pieces from the French Curves Collection:
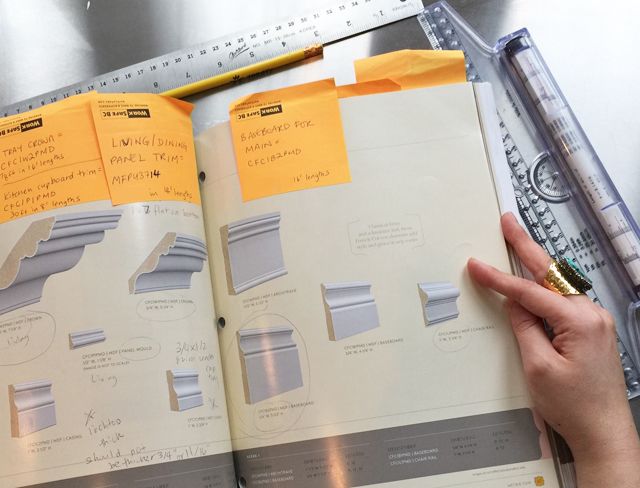
[Specifics: we chose this recessed panel mould, this crown, this baseboard, this chair rail, and this door casing). The main products were selected from the French Curves Collection (Scene I)]
After choosing the collection we loved, we began to draw out our vision in the most amateur and non-AutoCAD way (on random notepaper, non-the-less). I looked to places like Pinterest to get a feel for the shapes that would work for my staircase and entry. What then dictated the measurements was the width of our flat stock. Once we new how wide the flat stock would be (in our case 5 1/2") we could plan the size of each 'cut out' shape. We literally then drew this out on the wall itself.

From there, we working with professionals to have our vision carefully installed. We managed to use MDF flatstock on the curved walls because our clever trim-installer Mark was able to notch the pieces so that they could flex and bend (see photo below). If you have a straight staircase you won't run into this problem which created an added step for us!


The one place where we could not use MDF was the baseboard on the curved wall - baseboards are typically thicker than flat stock and likely won't be easy to bend! We purchased a rubber mould instead which you can see in the process of being painted just below. Once it had 3 coats, there was no way you could tell it was rubber any more! Again, if you have a straight wall you won't have this issue, but anyone with this classic 1980's shape will know exactly what I'm referring to :)

A few tips I can suggest if you are embarking on a trim project:
Tip 1: Measure the amount of product you will need (always measure twice) and then add 10% for waste. This saves you time, and possibly money if you need to have additional product shipped or delivered later. When in doubt hire a professional, they could actually save you money in the long run.
Tip 2: Make sure you account for the space needed to fit door frames and baseboards into your design layout. For example, if you look at the image directly below, you can see that the vertical pieces of flat stock used for the panels were 5 1/2" wide. Then look at the bottom piece of flat stock running horizontally along the floor - It's much wider so that once the baseboard is nailed on top of it there will still be an overall border of 5 1/2" surrounding the recessed portion. You'll need this extra amount of space for your door casings to overlap with the flat stock as well.

Tip 3: Choose your lengths wisely! Several of Metrie's products come in a few options in terms of lengths; for example our baseboard selection was offered in 8', 12' or 16' lengths. Got an extra long wall? Make sure you have a 16' length for it so that you won't have any unsightly cuts or joints somewhere in the middle of the wall. This kind of attention to detail will help elevate your finished space.
Tip 4: Go big or go home! I was initially afraid to choose beefy baseboards and crown because we were working with a space that only had 8 foot ceilings. After seeing the 5 1/2" base and 4 1/4" crown, I am so happy I did not go smaller out of fear. As much as it sounds like it should be the opposite, it has made this overall small space seem larger and brighter.
I can very honestly say I believe that trim is what transformed this dated 1980's home. Whatever you can dream up you can accomplish with trim, and getting creative with it is the fun part. I hope I've helped to break things down a little and take some of the intimidation or mystery out of the trim process. If you have additional questions please leave them in the comments below!
I'll leave you will a little sneak peek of the living room reveal just to entice you to come back soon and visit for another before & after post ...

Metrie can help make this process easy with their online tools and suggestions. Here is where you can go for more information:
- What are Interior Finishings?
- Metrie's YouTube channel
- The Finished Space® blog


4 comments:
Oh my word, I cannot wait for that living room reveal. Thanks for breaking down the moulding project for us dummies – I've always wondered where to even begin designing something like that. And I cannot believe you have no design or AutoCAD training – that's amazing!
I love it every time you share pictures of your home! We've been wanting to add trim detail to several rooms in our home and this post is super helpful. Cannot wait to see your living room Nancy!
All of it is beyond beautiful! You and your family have done an amazing job transforming this home. Can't wait to see the living room reveal. I'm already dying over the sneak peek photo!
Nancy I've so enjoyed seeing your updates to your home. The moulding truly transformed your entry, it is so beautifully detailed. I can't wait to see more of your living room!
Post a Comment