Monday, August 8, 2011

{before & after: my front door}

Finally got one of the smaller projects around my home all done! My front door got a nice fresh coat of paint; it was already black on the outside but was left white on the inside when we bought the house. I had wanted to paint the door black inside since day one, but was warned by others that it may make our little entry way dark and dreary. But I finally threw caution to the wind and followed my heart and I am loving the results! A small makeover indeed, but it's funny how the little things can make you smile :)

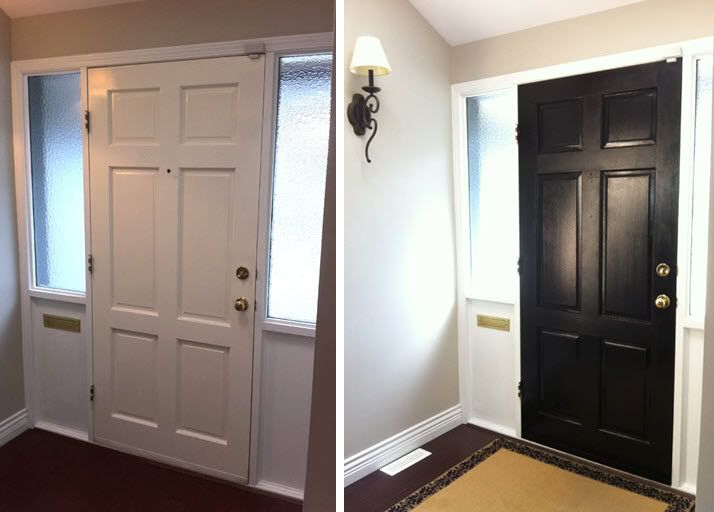
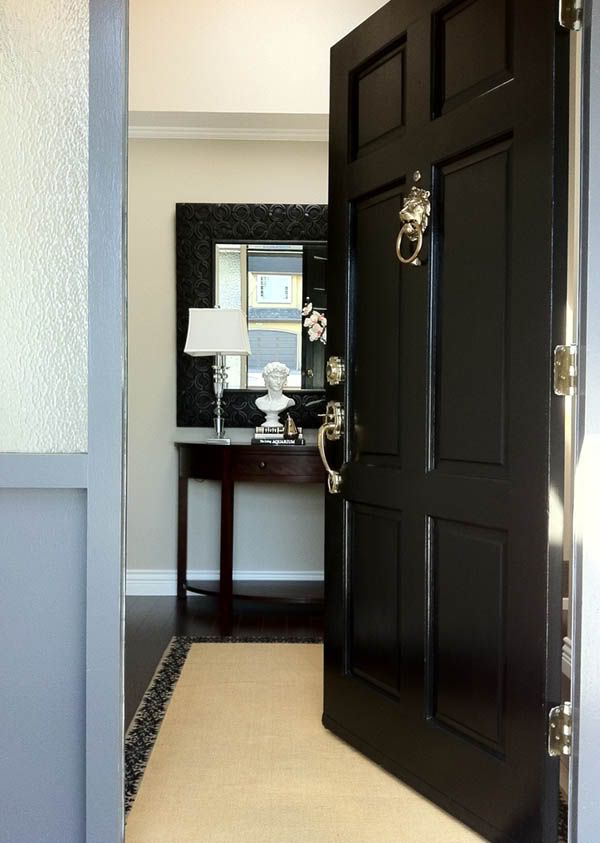
We used an interior/exterior paint on both sides in a black semi-gloss latex {from Dulux}, the shine definitely added a glamorous effect:


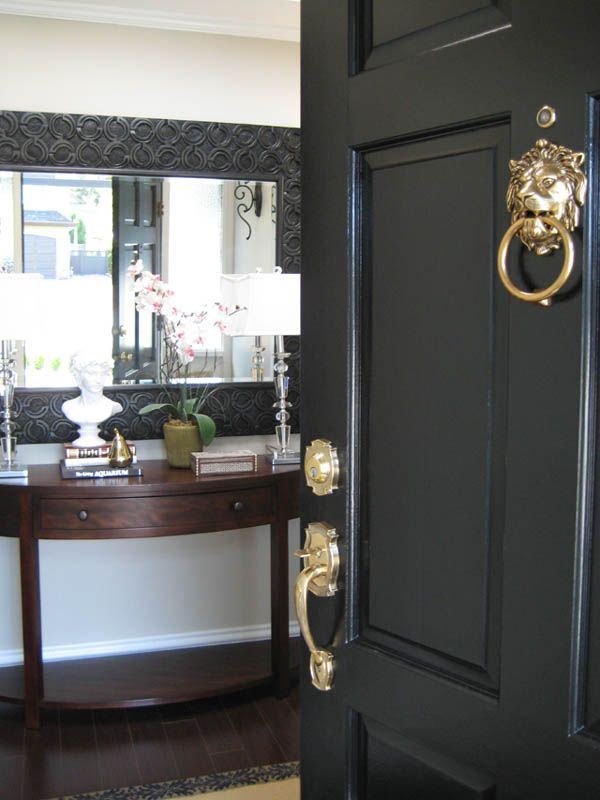
So .. did you spot my new best friend?? The lovely bronze lion head door knocker is my favorite recent addition ... Hollywood glam or what? And for a mere $39.99 from Lee Valley Tools, I am in love!


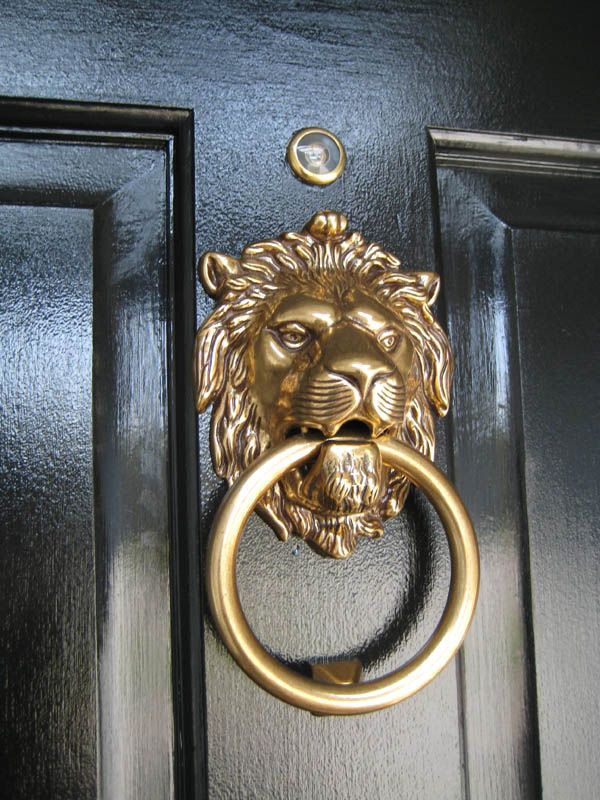
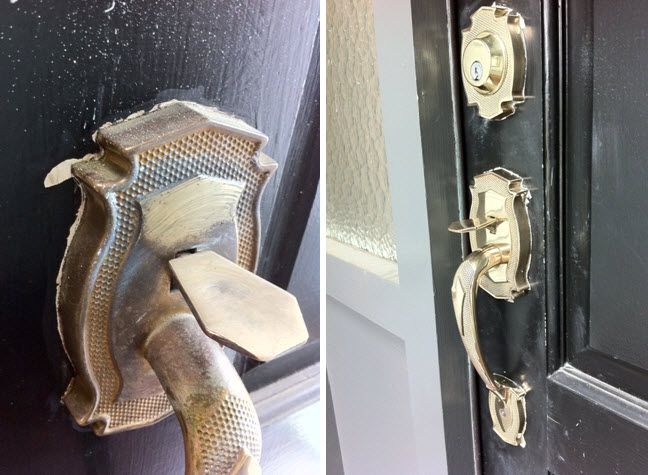
This may look like it was a tiny job, but a fair bit of elbow grease went into it, what with the sanding, and taping, and painting etc etc ...  uughh. Another detail we wanted to address was the hardware currently on the door. Though it was all bronze, it was dingy and quite oxidized and we needed it to have a similar finish to the lion head knocker. We contemplated replacing the handle with something shiny and new, but then thought, ugh, an additional cost we didn't anticipate ... total "reno snow-ball effect" as I call it, one thing always leads to another!

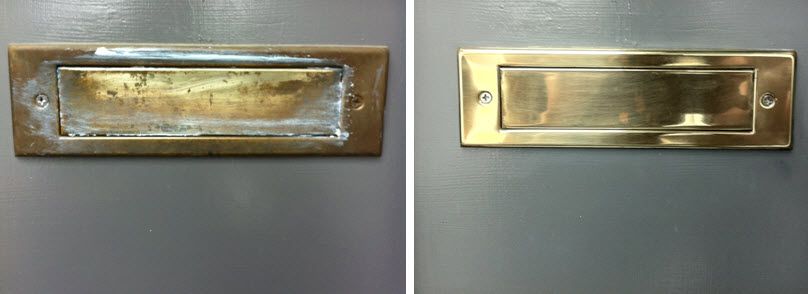
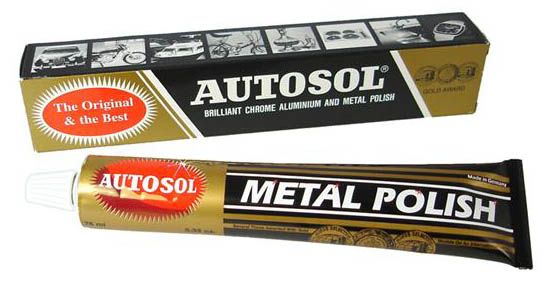
But here's where the real elbow grease came in: instead of going out and buying something new, we brought our bronze hardware to life with simple metal polish!! This stuff works miracles, check it out! You can see on the left we just began to put on the cream polish, and on the right, ALL NEW!


Can you see that around the handle above was left white by the previous owners? And believe it or not I'm pretty sure a Sharpie marker was used to conceal that as much as possible {oh dear}. The polish makes a bit of mess, so it may be wise to take the hardware off the door, but since we were painting it didn't really matter.


I had never tried this stuff before, but if you've got exposed bronze that has tarnished I would definitely give it a try! {Autosol Metal Polish, approx. $8.00}.


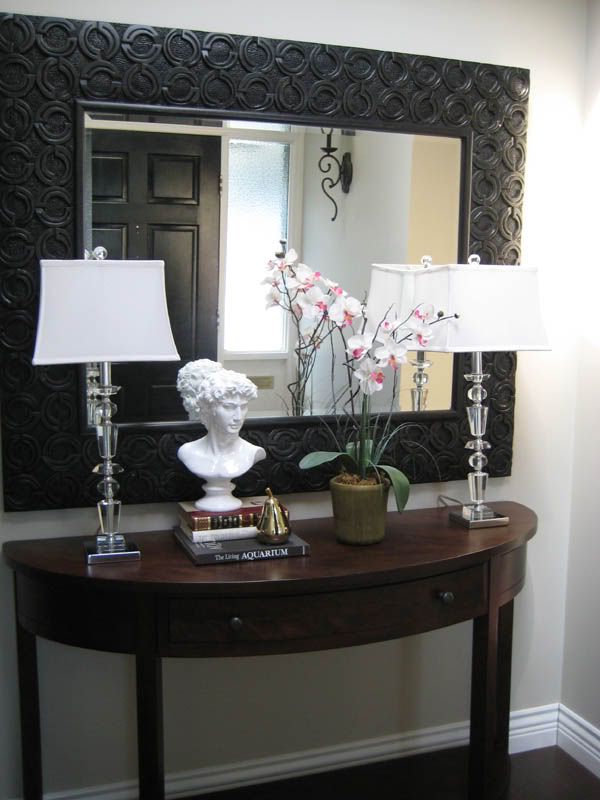
So here is a view of the interior of the door before and after getting a coat of fabulous black:


I love the peek of black I get in the mirror across in the entry way, although I have to admit that for a few days the darkness would startle me as it looked like the door had been left open, ha ha!


YUM! All in all, I am quite happy with the results :) And the grand total for all supplies was: $40 black paint + $40 for the lion head knocker + $8 for the bronze polish + some sweat = $88 for a brand new glam door! You can't beat that!!


Any summer projects you have been working on lately? I've got more up my sleeve that I'll be sharing with you soon!

Sunday, June 19, 2011

{happy father's day}

Happy Father's Day! Hope you are having a fabulous Sunday :) I had to share one of my favorite photos of my Dad in his childhood, I just love this picture!  And what's really special is that I got to see this home pictured below for the first time last summer on my trip to Egypt. Shortly after, it was torn down due to large excavation projects currently underway in Luxor. So glad I got to visit my Grandmother's home before it was gone.


If you ask any one that knows him, they'd tell you I have the best Dad EVER!! Happy Father's Day to you Dad, love you so much :)

Sunday, June 12, 2011

{canadian design & lifestyle bloggers west}

Had a fabulous weekend full of sunshine, family, and friends! This Saturday the Canadian Design & Lifestyle Bloggers West network met up for lunch in Vancouver, and it truly is exciting to see our numbers grow. If you are a blogger in Western Canada, please hop over to our blog and contact us to recieve more info!


We enjoyed a delightful lunch at the Banana Leaf, and much of our discussion revolved around our event plans coinciding with the IDSWest show in September {29th-October 2nd}, stay tuned and follow along for updates. Sponsors, seminars, and tours are in the works, but one things for sure ... Western Canadian bloggers will be out in full force!


Wednesday, February 23, 2011

{diy draper faq's + bedroom before & after}

First a HUGE thank you for all of your kind words and encouragement on my IKEA Rast project, I am overwhelmed by your response! And a big welcome to all my latest followers, I am so thrilled to have you here.

Today I thought it would be fun to include a little before & after of our bedroom, mostly because before & afters are just so darn satisfying aren't they?? We were lucky enough to be able to take pictures of all of the rooms before we owned the house {the day we had our home inspection done} so the before pics are that much more disastrous :)


What a difference simply cleaning and painting can make! We got rid of the fuzzy blue carpet, added baseboards, wood blinds, and a chandelier. Can you believe there was NO light fixture in this room? Only lamps controlled by the light switch. Oh the 80's.

And as a follow up to the frequently asked questions you had posted on the DIY project, here's some additional info:

Rast Dresser Primer: I forgot to mention that I used Behr's Premium roll-on primer in white to coat the dressers. I'm sure black would have been better but I couldn't find and oil based black primer! Oil was recommended to me as I planned to use a black lacquer spray and this would help to hide the grain on these untreated pieces and give a smooth finish. I did 2 coats and sanded with a furniture grade {220} sandpaper in between each coat.


Stencil: I thought images may help with the questions you had about my stencil:


{There's my curious little fur baby ... always seems to make it in the background of pictures ... he's like the Where's Waldo in all our family photos!}


You can see we kept four gaps in the inlay so that the centre of the stencil would stay attached to the outside. If you didn't leave attachments the middle would fall out. More importantly, this means the centre will always be in the exact same spot!

Headboard: This was a very affordable find through Costco online! Believe it or not this piece came in at $339.99 including shipping.

Paint: The walls were painted Benjamin Moore's Escarpment, one of my favorite warm shades of grey.

Pillows: The lovely pattern fabric is KWID's Imperial Trellis, and a shout out goes to my fabulous friend Laura for sewing them for me :)


A big thanks to Jenny at Little Green Notebook for posting this project and Kate at Centsational Girl for linking to it on FB :) Also, I'd LOVE to do a post and have anyone that tries this at home submit your own version! Please let me know if you do give it a try, I can only imagine all the variations on this project that could result!


Sunday, February 20, 2011

{my ikea diy: dorothy draper style!}

If you are following my blog you may have noticed that I am not the biggest 'DIYer' - I wish I was but I am often the type to start a project and not 'quite' finish it, or I have too many ideas in my head that so few of them actually come to fruition. Well this time around I finally put the pedal to the metal and finished a project that I am quite excited to share with you! Here's how I took this plain jane IKEA Rast dresser from drab to fab, in true Dorothy Draper form!

So I started out with a couple of these ....
And turned them into this!


How I got the Dorothy Draper inspired look:

1) I bought 2 Rast dressers from IKEA, and assembled the tables, except for the drawers.

2) I primed the 'body' of the dresser {assembled} and the fronts of the doors and then sprayed them using RustOleum's black lacquer spray {Tip, I would buy the attachment for spray paint cans to make spraying evenly much easier...oh, and wear a mask and spray in a well-ventilated area!}. I did 2 coats to get good coverage.
 
3) I took inspiration pics from Dorothy Draper chests online, and blew them up to be able to draw the shape of the inlay on a piece of transparent paper that I cut to be the same size as each drawer. Here is where the measure-twice-cut-once rule really applies! To be truthful, this is where my Dad's engineering skills came in handy, thanks Dad!  We cut the stencil using an art Xacto knife, leaving gaps so that the centre of the stencil stayed attached to the outside. We secured the stencil onto the drawer using painter's tape.

4) Using Liquidtex's Iridescent Rich Gold heavy body acrylic paint, we carefully painted on the design. I removed the stencil after allowing the paint to dry for about 1 hour. I taped off the gaps that remained (due to the stencil) and filled those in. I let this dry over night and then went over the gold free-hand to make it even thicker afterwards.


5)  I then put the drawers together on the built shelf, and put in some beautiful bronze ring pulls from Lee Valley Tools. Confession: I still have to coat these babies in a glossy varathane to protect them (on the to-do list!).

Source guide:

Ring pulls: Lee Valley (size: 51mm x 43mm- $2.40 x 12)
Side Tables: Ikea Rast Table ($29.99 each)
Black Paint: RustOleum's Black Lacquer spray ($5.99 per can x 4)
Transparent Stencil paper: Opus Arts ($1.80)
Gold Paint: Liquidtex Iridescent Rich Gold - Opus Arts ($6.60)
Xacto knife: Opus Arts ($3.49)


So the total cost for 2 fabulous, Dorothy Draper Espana Bunching-inspired bedside tables ... drum-roll please!!


Just under 125 dollars! Not bad right? Especially since I know I'm not able to afford a real-deal DD piece anytime soon ... some of these well restored fabulous dressers can run you up to $4000 each! And yes, I know that some people have found them in antique stores for  around 20 dollars in the States, but I can't even imagine finding anything like that here in Vancouver! For now, I'll be happy to enjoy my little DD-wannabe dressers :)

Be sure to check out some of the FAQ's about this project + a fun before & after of our master bedroom here!


Tuesday, December 21, 2010

{ny: christmas in the city}

I'm back from New York City and finally getting into the swing of things at home. What a trip, I had never been to NY before and I must say that it is the only city I have visited that I could see myself living in a heart beat! And at Christmas time, this city is simply magical and enchanting in every way! Two of my girlfriends and I covered the entire town in a short amount of time, everything from the Met, to Ground Zero, to the Statue of Liberty, to Carnegie Hall ... here are a few pics to sum up our trip:

The tree at Rockefeller Centre

Our hotel {Novotel} was right in the heart of Times Square on Broadway {something I learned ... Times Square was named after the New York Times newspaper!}.


We saw the city from the top of the Empire State building, it was amazing! There's the Chrysler Building from a distance:


A window inside the Empire State Building

We managed to catch a couple of fabulous shows, Jersey Boys and the Rockettes at the Radio City Music Hall {a Christmas MUST! They included a live nativity scene that was incredible!}.


Central Park was like a post-card every way you turned:


Fabulously restored Brownstones in Harlem:


The stores along 5th Avenue were dressed to the nines for the Holiday season, Fendi was a favorite of mine:


The Christmas windows were magical; Bergdorf Goodman, Henri Bendel and Tiffany's were some of my absolute favorites.

Henri Bendel

Tiffany & Co.

Tiffany & Co.

Speaking of Tiffany's, my gals and I decided we couldn't dare leave the city without a little souvenir! So what did we do? We headed there on our way to the airport, luggage in-tow, and picked out a little something: the Heart Tag Key Pendant ... in a sense we felt like we were taking the key to the city home with us! And what an amazing city it was!! I can't wait to return.

Our Breakfast at Tiffany's!

Now I can't believe it is only a couple of days till Christmas! I've finished my shopping and now it is a matter of wrapping and cleaning, which I started today but my house feels like it's been turned upside down since we had our kitchen counters installed last week. Still no backsplash or sink/dishwasher if you can believe it. Ugh!!

Here's a sneak peek of the telephone desk {because the rest is not quite ready for it's debut ...}, we have yet to touch up the paint where things got damaged in the process, and once our sink and backsplash are in I promise to show you some fun before & after pics!


And it wouldn't be Christmas without the Christmas tree, here it is in all of it's glory ... with a little touch of turquoise added this year.


Sorry for the crazy long post, lots going on around here these days! Have you finished your shopping and wrapping yet? Hope you are all enjoying everything the Christmas season has to offer!


Thursday, December 9, 2010

{a sneak peek at my kitchen reno}

I am so excited this morning that I just had to share a tiny peek with you! I am finally getting new kitchen counter tops TODAY! We have been wanting new counters ever since we moved in this home over 3 years ago, and they'll be installed this morning :) We {aka hubby} had already painted the oak cabinets white before we moved in, and now along with our counters we will be putting up a new backsplash! So I have been 'counter-less', and even more devastatingly 'sink-less' for a week now... needless to say the Christmas baking has been brought to a screeching hault!


Here's a tiny view of what the former 1986 beige formica counter and backsplash looked like, I'll have a FULL before & after post coming up when everything is done, so stay tuned! Let's just say this kitchen has come a far way from the mid-80's! {Seriously, can you imagine that some one, at one time, picked out this flower backsplash for their kitchen? Wow.}


Can't wait to share my choices and the final results with you. Hope your week has treated you well, it's almost Friday!!

Related Posts with Thumbnails
 

© 2010-2017 Nancy Marcus. All Rights Reserved. | Blog Design By Brittany Douglas