


If you are following my blog you may have noticed that I am not the biggest 'DIYer' - I wish I was but I am often the type to start a project and not 'quite' finish it, or I have too many ideas in my head that so few of them actually come to fruition. Well this time around I finally put the pedal to the metal and finished a project that I am quite excited to share with you! Here's how I took this plain jane IKEA Rast dresser from drab to fab, in true Dorothy Draper form!
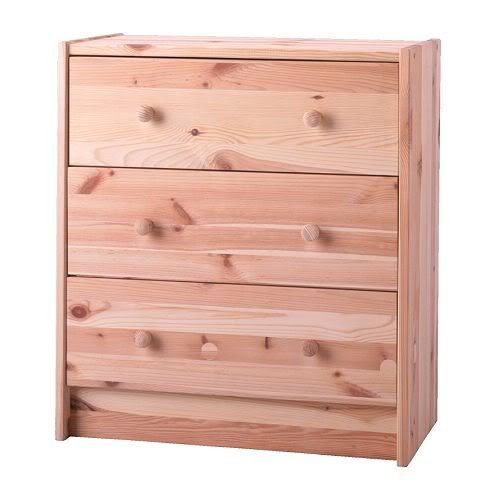
So I started out with a couple of these ....
So I started out with a couple of these ....
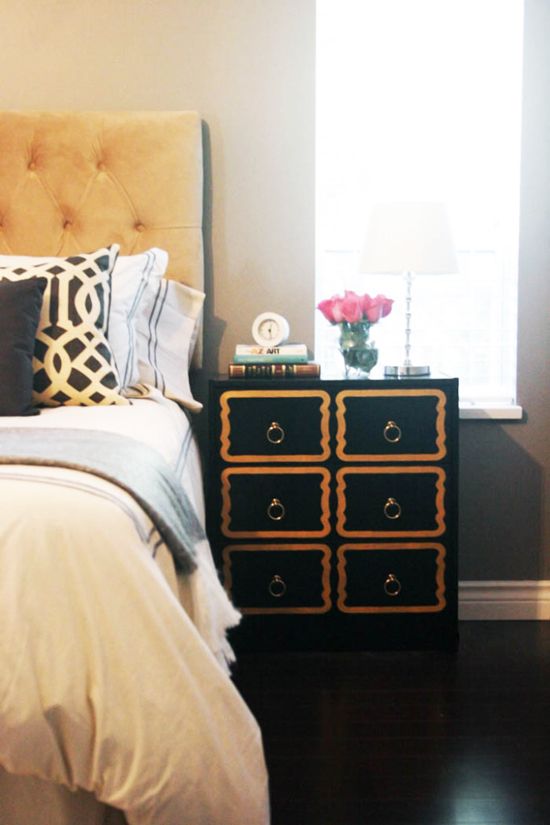
And turned them into this!


How I got the Dorothy Draper inspired look:
1) I bought 2 Rast dressers from IKEA, and assembled the tables, except for the drawers.
2) I primed the 'body' of the dresser {assembled} and the fronts of the doors and then sprayed them using RustOleum's black lacquer spray {Tip, I would buy the attachment for spray paint cans to make spraying evenly much easier...oh, and wear a mask and spray in a well-ventilated area!}. I did 2 coats to get good coverage.
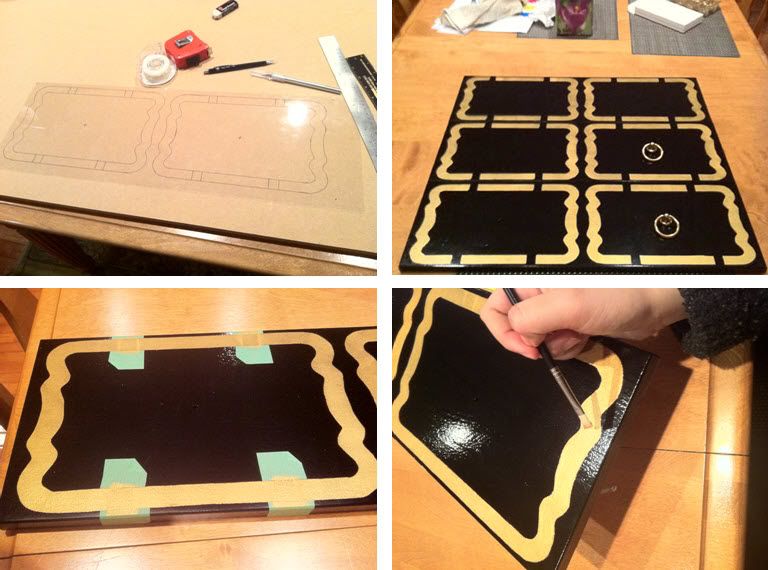
3) I took inspiration pics from Dorothy Draper chests online, and blew them up to be able to draw the shape of the inlay on a piece of transparent paper that I cut to be the same size as each drawer. Here is where the measure-twice-cut-once rule really applies! To be truthful, this is where my Dad's engineering skills came in handy, thanks Dad! We cut the stencil using an art Xacto knife, leaving gaps so that the centre of the stencil stayed attached to the outside. We secured the stencil onto the drawer using painter's tape.
4) Using Liquidtex's Iridescent Rich Gold heavy body acrylic paint, we carefully painted on the design. I removed the stencil after allowing the paint to dry for about 1 hour. I taped off the gaps that remained (due to the stencil) and filled those in. I let this dry over night and then went over the gold free-hand to make it even thicker afterwards.
5) I then put the drawers together on the built shelf, and put in some beautiful bronze ring pulls from Lee Valley Tools. Confession: I still have to coat these babies in a glossy varathane to protect them (on the to-do list!).
Source guide:
Ring pulls: Lee Valley (size: 51mm x 43mm- $2.40 x 12)
Ring pulls: Lee Valley (size: 51mm x 43mm- $2.40 x 12)
Side Tables: Ikea Rast Table ($29.99 each)
Black Paint: RustOleum's Black Lacquer spray ($5.99 per can x 4)
Transparent Stencil paper: Opus Arts ($1.80)
Gold Paint: Liquidtex Iridescent Rich Gold - Opus Arts ($6.60)
Xacto knife: Opus Arts ($3.49)

So the total cost for 2 fabulous, Dorothy Draper Espana Bunching-inspired bedside tables ... drum-roll please!!

Just under 125 dollars! Not bad right? Especially since I know I'm not able to afford a real-deal DD piece anytime soon ... some of these well restored fabulous dressers can run you up to $4000 each! And yes, I know that some people have found them in antique stores for around 20 dollars in the States, but I can't even imagine finding anything like that here in Vancouver
Be sure to check out some of the FAQ's about this project + a fun before & after of our master bedroom here!


122 comments:
Wow, they look so fantastic! You did a great job!
Holy Guacamole, goodness gracious me. Fantastic!!! You are so inventive, what a fantastic IKEA hack you are. IKEA to Draper? The design world will go ga ga.
Amazing!!!!
xoxo
Kate
Bravo! You did a great job.
Mary Ann
Nancy you are so a DIYer, I am totally impressed and I love Dorothy Draper!!! Kudos to you little Miss!!! Bravo!!! Lovve them,Kathysue
Are you kidding me? Those are fantastic! You should be VERY PROUD!!!
Amazing such a great idea!im proud of you! like you, I alwatys have ideas in my head and they usually stay there! (lol)
love it, i'll to do is as well and update you!
thanks for the inspiration!
xoxo
sara from Table Couture
www.tablecouture.blogspot.com
Amazing transformation! I have been loving that style dresser too. You nailed it!
those a spectacular! I used a pair of unfinished ones as bedside tables for quite some time.. think you've inspired me to get them done!
Just brilliant. Job well done.
Sandy K
Wow. No, wait. I mean WOW!!! That is some mean execution. You've really done a stupendous job. Enjoy the fruits of your labor!
Fancy Nancy! I promise you, this DIY will be popping up all over! Its just that good!
Mr. Goodwill Hunting
Well, hello there, Miss GENIUS!
Am instantly smitten with your project and your blog - Way. To. GO!
Amazing!! I am so impressed! Would love to recreate these for my house. Just found your blog and I am going to back now to read all your past posts! Loving it, excited to be a new follower! xoxo
http://designerbagsanddirtydiapers.blogspot.com
Soooooo good!! Love them!
shannon berrey designs
BRILLIANT!!! coming over from LGN and wanted to say congrats on one fabulous DIY!!
Have Mercy, Nancy! At first glance I thought you'd carved the design. This looks amazing and kudos for your inventiveness.
xoxo
Erika
looks fantastic!
This is amazing! Job well done. I'll be reading from now on.
Amazing and inspirational!
There are times when the design blog world all goes OMG and this is one of those times!! This is fantastic and creative and your bedroom looks amazing!!! Into my design files you go! (:
This is awesome Nancy! I love the shape of these little dressers. There's so many things you can do with them!
that is utterly amazing! and i have a knockoff i have been looking for pulls for so thanks for posting where you got them. :) i am about to become a follower and am looking forward to getting my socks knocked off more!
i am obsessed, fantastic job!
amazing! you got some serious talent.
YAY! You are done! They look soooo good! I remember when they were in the stencil stage. You should be so proud, you have truly created an amazing knock off!
Now I can write up my rast round up!
I am a new follower....Fantastic! I just painted my Draper chests from this color to a peacock blue and this is making me miss them....boo hoo!
Wow they look absolutely incredible!!!
This looks amazing! Love the black pillows!
awesome job! they look great in the room!
Looks like you are officially a DIYer now, you did a great job. Aren't Dads the best !
Firstly, holy amazing, Batman. That's one hell of a transformation! You give hope to all of us lacking power tool skills, but have a steady hand and a sharp eye.
Secondly, where is your headboard from? It's killer.
This is amazing! YOu are so creative!
Fantastic job! What brand of primer did you use, and was the primer black and spray on as well?
Nancy!! I am so proud of you!! I'll pay you to make me a set too! LOL. You should go into business with those beauties!
xoxo
Wow, so gorgeous!! I just found your blog via Little Green Notebook and I love it! Great job on those stunning dressers! New follower for sure :)
Have a wonderful week!
Dana
http://southerninspired.blogspot.com/
Okay, TOTALLY blown away by this, you are amazing! Can't believe you don't do more stuff like this, you definitely should :)
Um hello miss DIY fantastic- these are AMAZING!!! Seriously Nancy, they are just completely fantastic. I'm so so saving these for inspiration- have a couple of night stands that I would love to do this to. Thank you so much for this DIY marvel- utterly impressed!!
Okay, I am going to pull a big copycat. That was an amazing transformation and I have two higher IKEA chests already.
You should do a post and have anyone that tries this at home submit their version. I promise you there is going to be a lot of copycats out there.
Thanks for sharing.
Vikki
Fantastic - I need matching nightstands or dressers like these.
pve
Nancy, I am totally impressed!!! You did an amazing job. I am not a DIYer at all either but this has inspired me!
Wow! Congrats on a fantastic DIY project! Love it.
an amazing project. So glad I found you through Little Green Notebook!
-{darlene}
fieldstonehilldesign
Wow, wow, wow!!! They look amazing! What a clever designer you are!
These look so incredible!!! Seriously, I can't believe you created these yourself - they look fab!!!!!!!!!!!! :)
Well for someone who doesn't consider herself to be a diy'er you did a fantastic job. They are really beautiful.
Darling! You are fabulous! Love the 'hack' and the whole room looks fab! Angie xo
This is an amazing makeover! The dressers look amazing! Just found your blog and love it! I am your newest follower.
Oh wow, these look like a million bucks. Great job for someone who claims to not be a DIYer. I think you've found a new calling
Wow- these look incredible!! Great job!
This is genius!! Come to my house!!
You had me at Dorothy Draper...but $125 for *BOTH*??? Ridiculously good. I'm totally putting your link up on my bloggy...and will be a dedicated follower from now on! (c:
...now I can pick my jaw up off the floor and go back to drooling over the rest of your blog...
Wow...this is terrific! I need bedside tables so badly and these look perfect and have the perfect price tag. I understood everything but the stencils. Not sure I can make them but might have to give it a try!
You should submit to jules at www.ikeahackers.com too! They need more beautiful examples of Ikea transformations. And in my opinion the best ones on there are from BC girls!! Looks amazing great Job!
very nice!
love love love AND just what I'd love to recreate for my mom for her mother's day gift! She would be smitten with something so pretty!!! You have a gift my dear. The decor worlds mouths just DROPPED today , believe me :)
A M A Z I N G!!!
I am so IMPRESSED! Wow! Thanks for knocking my socks off today!
Wow, these are INCREDIBLE! Absolutely love them.
On a separate note, where are your gorgeous pillows from on the bed? I basically just want to move into your bedroom. In the least creepy way possible.
So Lovely nancy, good job! Rustolium is pretty tough so I am not so sure you have to put on a top coat but is you do you have to use oil base.
Cat
All I can say is wow. You did such a great job. I linked over from the Little Green Notebook. I am your latest follower. I would love for you to come and check out my blog and follow me back at www.dybydesign.blogspot.com. Thanks so much.
Knocked it out of the ballpark! If I weren't so tired I would be driving to Ikea right now! I am in love. You are a rock star.
so awesome!!!
Absolutely amazing! You did such a wonderful job! And they are stunning!
This was sooo COOL...I was like " wait a minute, is this the same dresser?"
I almost didnt believe it until i scrolled down. Im IMPRESSED....I hope this ends up on Apartment Therapy at least! :))))))))
www.madebygirl.com
madebygirl.blogspot.com
I must say you have done an amazing job!..I am so excited for you!..They look beautiful!
Wow Nancy - amazing! It's official - you ARE a DIYer.
I found one of these at the online classifieds, titled black and gold dresser. Had been online for almost 20 days. Glad I live in Utah and not that many people are aware of the fun find. I am sure it is not real and will post on my site soon.
www.thefinde.net
They are amazing, Nancy! You're giving hope to us DIY-challenged folks who wish our projects looked that good. Awesome!
Ugh. I used my daughter's profile to leave this comment :)
They are amazing, Nancy! You're giving hope to us DIY-challenged folks who wish our projects looked that good. Awesome!
I too linked over from LGN. These are SO beautiful. I have an old Ikea dresser (tall and narrow) that I might try this with. Not quite DD's look, but I think it would work in my room. I don't suppose you'd be interested in posting a link to the stencil design for all of us copycats out there? And I too think that you should submit this to ideahacker.
Ok so I just posted but you got me too excited about mine and had to post it. Check it out www.thefinde.net
my head is about to explode my gears are spinning so fast!!! this is gorgeous...you are so talented and inventive!
and how have I not seen your blog before...i know all these people who comment?!?! thrilled to have found you now...and following!
amazing... can you clarify this part: "leaving gaps so that the centre of the stencil stayed attached to the outside." do you mean you taped the stencil down at different points so it wouldn't move when you painted the gold parts? sorry.. i am a novice and am trying to imagine your exact steps.
Wow Nancy this is beyond amazing!!! You are so talented!! I love your blog and I can't wait to see your next project you are brilliant!!
Margo
My goodness Nancy this is fabulous! Wonderfully done! xoxo
OMG! UNBELIEVABLE!!! You are sooo amazing!!! I just found your blog through LGN and I am your new follower!!! You've got some talent girl!!! This goes on my DIY list!!!
xoxo
I saw your DIY dressers over at The Little Green Notebook and LOVE them. I'm going to have to try this out myself. Great work & love your blog!
Well I am sure you have opened up a whole can of worms here in blogland! That little dresser has never looked so goo....awesome job Nancy...feel proud!!!
WHA!! Get out!!! Amazing job! This is really my all time favorite DIY job ever of all time! In awe of this!!!!
This is amazing!! I love it! Would you mind if I shared this DIY with full credits on my Blog?
Woooohoooo! Awesome Ikea hack, Nancy! You and your dad did a fantastic job - you replicated the originals perfectly! Don't forget us little people when you're a TV DIY star! :-)
WOW - those are FANTASTIC!
Absolutely fabulous!! Enjoy them! Janell
Wow! Fantastic!
That's just AMAZING!! I can't believe they are not the real deal, they look incredible! Great job Nancy!!
xo Linda =)
WOW! Amazing! I want one! Or maybe two! LOL! Do you think you can post a copy of your stencil? TY :)
Wow wow wow! Best dig I've seen in a long time!
Omg, I meant diy... Stupid autocorrect!
just linked from little green notebook. these are totally amazing!! i'm so impressed, seriously this is probably one of my favorite DIY's I've ever seen!!
Sorry, I later realized I wasn't real clear with my original post regarding the stencil. What I meant to ask for was a copy of a template of the stencil. Thank you!!! :)
Amazing! Love it to bits.
OMG AMAZING.
This is a first-why didn't anyone else think of this??? A Dorothy Draper chest alludes my budget, so your project inspires...you should market the template and DIY kit...I wonder if Dorothy would bristle? No matter, it's awesome!
TOTALLY SPEECHLESS!
Really great job. Congrats.
Stunning! Just lovely! I'm a new follower. I can't wait to go back and look at your past posts!
Nancy.....you are awesome! You deserve every bit of credit you're getting for this makeover!!! Seriously gorgeous! They suit your room so well too...just perfect!
You really need to sell these stencils!!! I'd buy one!!!
Vanessa
Absolutely brilliant - the side table look like a million dollars!! And Vanessa is right about the stencils ;-)
love this idea!! you did a fabulous job. we are planning to decorate our master bedroom soon and i think i will use this!!
You know you could sell those stencils on your blog - that is so amazing! I'm going to post it on my F&T next!
Awesome!
x
Maria
Omg! I am loving this! I have been looking for a Dorothy Draper dresser forever. I am definitely going to have to try this out. You are so creative!
What a fantastic hack! So super-duper good it just screams! LLUVIT!
So so glam!!! This is definitely one to try!
wow!! those look great!!!! found you through nouveastitch. seriously, i love those!!!
This is SO cool!!! I'm definitely going to use this idea for a drawer :)
Inspiring indeed! I have been keeping my eye out for a draper chest...well, now I can look to my local IKEA and MAKE them! just awesome.
Nancy.....you are awesome! You deserve every bit of credit you're getting for this makeover!!! Seriously
Nancy,
You re the queen of semi-customization. I saw you fantastic tables at Monika's the other day and was so impress by them. Congratulations. This proves anything can be done.
I would like to share with you a table I re-invented, but of course it's nothing compare to yours.
http://bellevivir.blogspot.com/2011/02/love-what-i-call-semi-custamization.html
P.S. I'm the newest face following you.
Lovely job on your dresser and I linked it to my dressers project post too, very nice!
Just landed on your blog today thanks to the lovely Monika of The Doctor's Closet. This DIY project of yours is incredible! Very inspiring. Thanks for sharing the process with us. I'd love to see more projects like this. Keep of the great work!
hi nancy!
I have been enjoying your blog for a while {think I found you via Jenny @ LittleGreenNotebook?}, and I always enjoy it when I pop in.
didn't realize I wasn't a follower, so took care of that tonight!
On monday I will be posting one of my Monday feature "ditto" posts, and before I go and forget to tell you, I am linking to this post for my readers to see and enjoy!
Stop by fieldstone hill design, anytime! But, especially this Monday :)
- {darlene}
fieldstone hill design. com
What a fabulous job and such a great tutorial!You have produced a fabulous piece of furniture - so gorgeous. I linked over from Apartment Therapy who have you featured with other Rast makeovers- Dorothy Draper is a new name to me, being European- but I am definitely going to read up on her.. I am your latest follower. I would love for you to come and check out my blog and follow me back at http://moderncountrylady.blogspot.com/.
SUCH a great idea!
Love the dresser. Gotta ask. Where did you get your geometric bed pillows?
This is hands down the best DIY project out there!! This is amazing! WOW!!
annie
I second this question. I was looking through the comments to see if I could find it. :)
Fabulous!!! This is a great post and really captured the look you were going for for sooo cheap! I look forward to reading more posts!
This is so amazing! You did such a fabulous job on transforming this ordinary side table to something so fabulous! Book marking this for sure :)
Would you be willing to sell your stencil! Please contact me ASAP
Sooo pretty!!!
Wow!!!!! Yours look just as stunning as the DD's!!
Post a Comment