Thursday, September 8, 2016

Reno Project Update | The Main Bathroom Befores


We've got so many rooms ALMOST complete in our house - it seems there is a few things left to do in nearly every space, but the good news is we are getting there!! I want to try to diligently post an update weekly to give myself a little extra nudge to get things done :) So here is my update for this week, the main (kid) bathroom. You know where we always have to begin - the ugly befores!! Here's a wide-angle realtor shot of this 1989 gem:
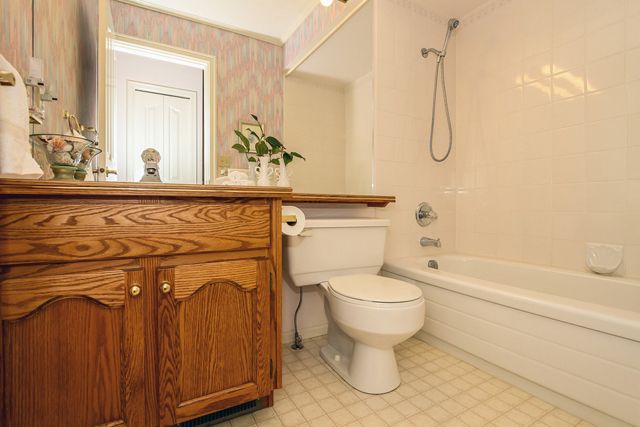

So once again we are dealing with linoleum, honey oak cabinetry, pink wallpaper, and a few flowery tiles bordering the top of the shower. There was no choice but to start from (almost) scratch:


Phew, that's a relief!
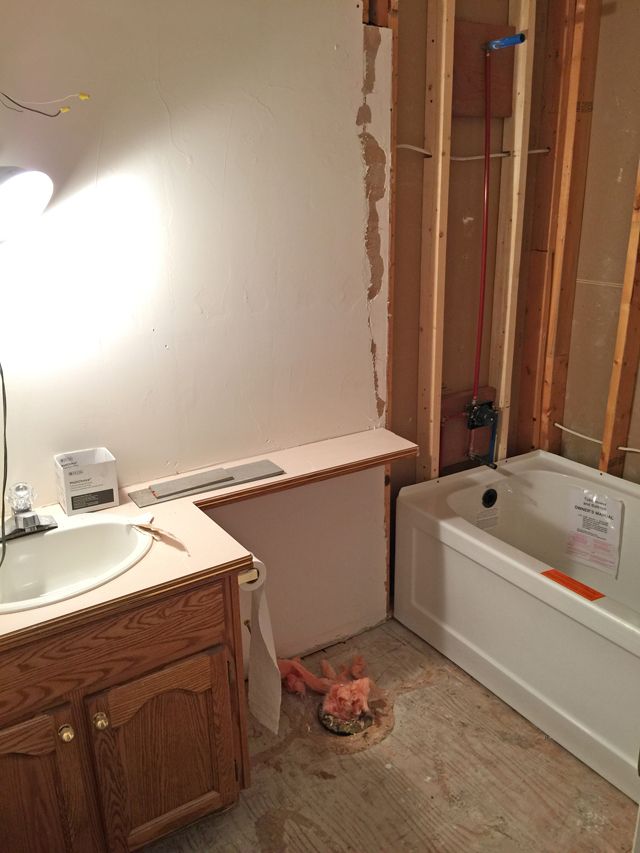

We actually got rid of the toilet and replaced the tub in the above photo as well. Really the only thing to stay was the box of the cabinet; to keep things budget-friendly we opted to replace only the doors with new ones and paint the unit out. We also wanted to maximize the feeling of space in this tiny bathroom so we removed the drywall ceiling drop within the shower (in other words, now the new shower tile can go all the way to the ceiling in there!)

So here is a peek at the mood board to give you an idea of where we are going with the design:
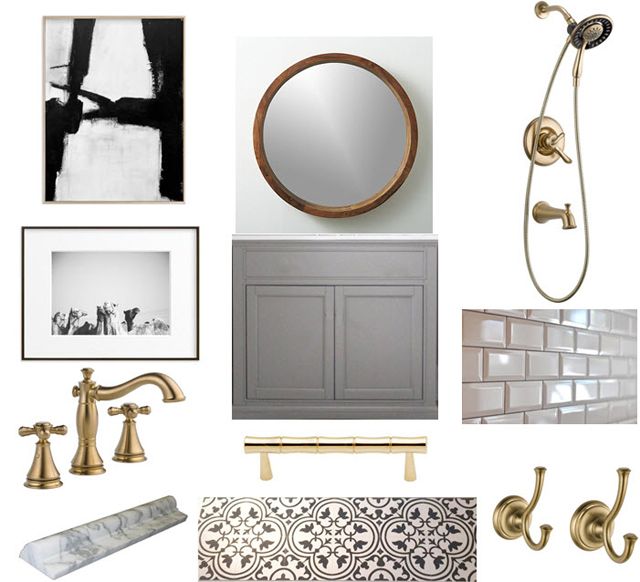

Minted artwork (Gentle Embrace and Leader of the pack) | CB2 Acacia round mirror | Delta Faucet Linden Monitor 17 series shower | Delta Faucet Cassidy widespread lavatory | Creekside beveled subway tile and Carrara marble chair rail | Rejuvenation Kanota drawer pull | C&S Tile Hydraulic tile | Delta faucet Cassidy robe hooks

I love the champagne bronze finish of the Delta Faucet the fixtures, it adds such warmth! I also feel like this is a "kid" bathroom that a child can truly grow with. Oh, and of course I had to add that pack of camels for a little dose of fun. We've taken the subway tile and chair rail all the way around the room at a 42" height, here's hoping it's easy to clean (...says the new mom who fears the potty-training stage)! And I'll leave you a teaser of the progress, the finished space to follow soon ...


PINTEREST    |    INSTAGRAM    |    TWITTER    |    FACEBOOK    |    BLOGLOVIN

Monday, May 23, 2016

One Room Challenge | Nursery Reveal | Spring 2016


Well my dear friends, it's a week and a half late, but I'm going with the 'better late than never,' perspective! The nursery for my ORC is finally complete!! Maybe a bit ambitious to commit to 2 spaces while caring for a newborn, but I still say that taking on the One Room Challenge was the only reason I got these two spaces done at all ;) (see the breakfast nook ORC reveal here).

Before I take you through the whole tour of the nursery, I want to take you WAY back, to what this space actually looked like when we purchased the home:


And by the look of the original bunny rabbits & pink bow wallpaper that we had to painstakingly remove bit-by-bit, it probably was a nursery in it's former 1989 life too!!


We smoothed over the awful textured ceiling, and removed the dinky chair rail and baseboard and swaped them out for some fantastic baseboards and door casings from Metrie's French Curves Collection, new beefy crown, and we got a little creative and utilized this chair rail for the window sill (where there was none before!). Just because you are working with a small room doesn't mean you have to use tiny trim, in fact I think these substantial pieces really helped to show off the angles of the space.


And this was officially my starting point for the 6 week challenge, Metrie trim installed, window was swapped out for a new modern shape, the Cole & Son Nuvolette wallpaper from DecoratorsBest was in place, and the lovely little brass chandelier from Shades of Light was installed.

So now without further adieu, some side by side before and afters, I'll let the photos do the rest of the talking!


The day bed with it's brass hardware and Hudson's Bay throw was very Nam Dang Mitchell inspired, I just love her style!


I love love love all the artwork from anewall, and I jazzed up the Ikea RIBBA frames below with a quick and easy touch of gold paint.


Because this was a more 'personal space' we tried to be mindful of adding personal touches all around the room; things like the pharaoh below, a nod to Marcus' Egyptian side, and a pillow with French script for his French side. We added my hubby's favorite car as well as art to represent his love of flying model airplanes, a children's book about my favorite scientist Louis Pasteur, and even a teddy bear in a lab coat and glasses to remind Marcus of his mama's Biochemistry background!


Source List:  French Curves Collection (Scene I) door casing, and baseboards, crown, and chair rail c/o Metrie | Garnished Medallion rug c/o Rugs USA | Cole & Son Nuvolette via DecoratorsBest | Artwork c/o anewall (except the DIY horse canvas) | Buffalo check and Paris pillows by Old Lake George | Chandelier via Shades of Light | Roadster and crib throw blanket via Indigo | Point Blanket via Hudson's Bay | Daybed and shelving via IKEA | Daybed hardware via Lee Valley | Crib via Shermag | Dresser via Craigslist |

Oh yah, and one more really important thing to show you, the inhabitant of this room! Who surely is going to throw everything for a loop in here once he gets mobile, but for now mom can enjoy all the pretty :)


You can view my full moodboards, and all the previous weeks of planning and prepping in weeks 1 | 2 | 3 | 4 | and 5. Thank you to all of you who visited week by week, a huge hug for taking this crazy journey with me and I hope you enjoyed the results as much as I am loving them!
 
PINTEREST    |    INSTAGRAM    |    TWITTER    |    FACEBOOK    |    BLOGLOVIN

Sunday, May 15, 2016

One Room Challenge | Nursery Update | Spring 2016


Happy Sunday everyone! Just checking in quickly to say I haven't forgotten to post my now WAY overdue ORC nursery - we've been delayed but we are almost there! The artwork is (mostly) hung & awaiting only the rug! My one DIY for this space was the horse watercolor with an Hermes inspired orange canvas wrap, which pairs perfectly with the gorgeous print from anewall.

Oh, and I should make mention that the cute little inhabitant of this room had a little something to do with its taking so long as well. I'm learning to expect everything takes approximately 3-5 times as long as my head thinks it should! Full reveal in the next few days :)
 
PINTEREST    |    INSTAGRAM    |    TWITTER    |    FACEBOOK    |    BLOGLOVIN

Thursday, May 12, 2016

One Room Challenge Week 6 | Breakfast Nook Reveal | Spring 2016


We did it! We made it through the 6 weeks, and sure there were a few hiccups here and there but overall I got more completed in these 2 spaces than I EVER would have done if I had not taken on this challenge. By far. Before I take you through the reveal I wanted to quickly take you WAY back, to what this space looked like when we moved in a few months back:


The biggest change to this room, which took place before our 6 week count-down, was to remove the railing between the adjoining room, get rid of the step down and level the entire space with new flooring.


There's no way we could have done those initial reno's in the 6 week time-line, but I thought you would enjoy seeing how far a room has come from it's original 1989 state! Ok, so with a few side-by-sides for dramatic effect, here are the before and after shots (drumroll please!!):


Something that was super important to us was getting the foundation right - everything builds off of here! So adding substantial baseboards and doorcasings with Metrie's French Curves Collection, plus some crown moldings, and the shaker style door by Masonite (brought to you by Metrie), and a lick of Chantilly Lace (Benjamin Moore) was just what this space needed to start with a clean palette.


Love that this space connects with the outdoor space on the patio so well, so I decided to take the blue & white theme right outside!


Source List: Door casings and baseboards from the French Curves Collection (Scene I) and crown moulding  c/o Metrie | Pantry door from Masonite - brought to you by Metrie | Rustic pedestal table and blue & white garden stools c/o O.co | Vanderbilt pillows by MotifPillows | Rattan chairs via Craigslist | Darlana lantern via Circa Lighting | Blue & white tableware via Bombay & Co | Placemats via IKEA
 
There were definitely a fair share of hiccups; we didn't quite get the artwork in time and had a couple of issues with framing, so I had to use one of my own pieces as the oversized piece for the reveal. The one DIY that we didn't quite get completed in time for the reveal was the placement of the Self-adhesive glass frost panels (c/o d-c-fix) that I am going to be showing you how to apply in a dedicated post (coming soon!).
 
You can see my full moodboard and step by step planning in weeks 1 | 2 | 3 | 4 | and 5. Thank you so much for following my ORC spaces, huge hug for taking this journey with me :) Don't forget to hop over to Calling It Home blog to view 200+ guest participant rooms and the stellar spaces completed by the 20 featured designers!

Be sure to check back shortly for the final reveal on my nursery, I'm literally sitting by the front door waiting for the artwork to arrive so I can post my second space. I just couldn't fathom posting without it in the room so I'm hoping I'll be getting a knock on the door any moment!!
 

PINTEREST    |    INSTAGRAM    |    TWITTER    |    FACEBOOK    |    BLOGLOVIN

Thursday, May 5, 2016

One Room Challenge Week 5 | Breakfast Nook | Spring 2016


The final week to get my TWO One Room Challenge spaces done! You can view my update on the baby nursery here. It's been busy but the truth is I've also had a lot of help in getting things done and for that I am super grateful. First up, the artwork situation; above you can see the lovely print by Ashley Goodwin (being modelled by my handsome hubby) which is looking a little lonely on that large white wall. I think I may just have the perfect partner for her - but I'm leaving that one to surprise you with the final reveal!

Here is a reminder of all the goodies going into this space from my original moodboard:

Rattan chairs (Craigslist) | Darlana lantern | My own artwork framed by Framebridge | Vanderbilt pillows via MotifPillows | Rustic table via O.co | Hawaii print via Ashley Goodwin
 
Next up on the list was to complete the frosted screen on the French doors, I'm going to dedicate a whole post on how to do this, but I wanted to show you a sneak peek. I had order 2 different levels of opacity of self-adhesive film from d-c-fix, and trialed both to determine how much blockage I wanted. I ended up going with the one on the right (called Frost) which was a touch more transparent and gave us all the privacy we wanted but would still allow a great deal of light in (in case you are interested the product on the left is called Milky and is more opaque). The best part is you can remove and reuse these as many times as you want! More to come soon.
 

Then we finally got down to recovering the chairs, lucky me my good friend Barbara of Hodge:Podge  blog is a master reupholsterer and came over to help me (aka completely do) one chair for me! Huge blessing as I had a crying baby in my arms most of the evening. Hubby graciously removed the old fabric and foam, and lo and behold found a second layer of ugly 90's flowery fabric below:


Here's a reminder of what the rattan chairs looked like in the fuzzy Craigslist ad photo:


And now, fresh and clean! Thank you Barbara and hubby - apparently it not only takes a village to raise a child, but it takes a village to complete the ORC as well :)


Here's my to-do's from last week with an update on where I am at:
  1. Order and frame all artwork (3 pieces total, got 2 done so far)
  2. Order faux white leather and foam
  3. Re-upholster chairs (almost done!)
  4. Buy place mats and a centerpiece
  5. Order the accent pillows for the chairs
  6. DIY frost screens for the French doors for privacy (almost done!)
On to the fun part of hanging the artwork and styling up the space :) Hop over to Calling It Home to be amazed by all the good stuff that everyone has cooking for their ORC spaces.
 
 
PINTEREST    |    INSTAGRAM    |    TWITTER    |    FACEBOOK    |    BLOGLOVIN
Related Posts with Thumbnails
 

© 2010-2017 Nancy Marcus. All Rights Reserved. | Blog Design By Brittany Douglas